 Muneem
.
1. Signing in
Open the app's website and press Start free or Sign in.
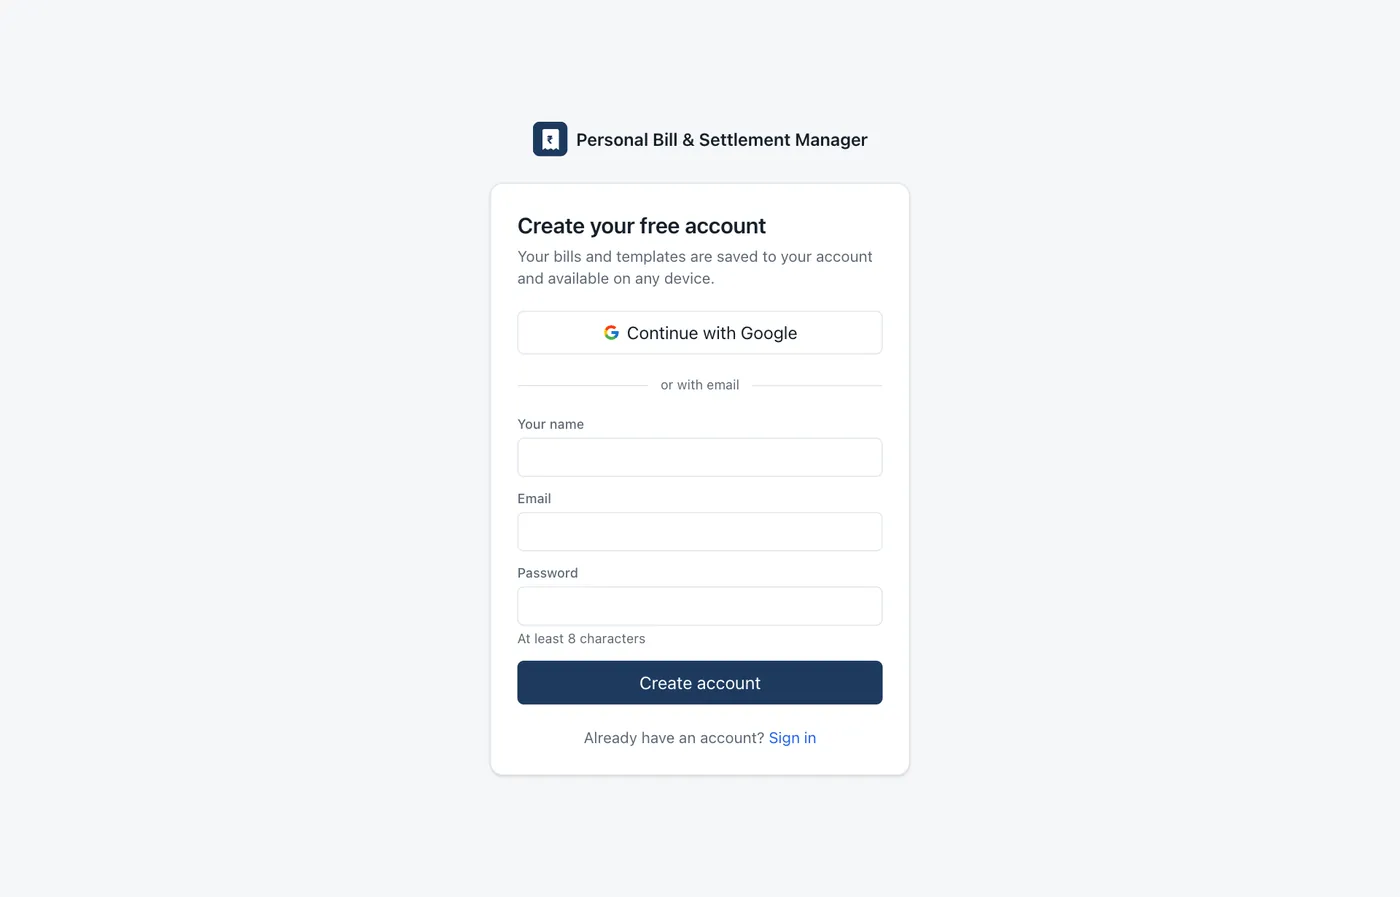
- Continue with Google is the quickest: pick your Google account and you're in.
- Email and password works too. Use at least 8 characters. The app sends a link to confirm your email address; until you click it, a reminder shows at the top of the app.
- Forgot password? on the sign-in page emails you a link to set a new one.
Your bills, customers, templates and settings are saved to your account, not to the computer. Sign in on your phone, a shop computer or a laptop and everything is there. Only you can see your data.
The bottom of the menu shows who is signed in and whether your changes are saved:
| Status | Meaning |
|---|---|
| All changes saved | Everything is stored in your account. |
| Saving… | Changes are being uploaded. |
| Offline: changes will upload later | No internet. Keep working; changes upload when you reconnect. |
| Sync problem | Something couldn't be saved online. A message at the top of the page explains why. |
On a shared computer, always press Sign out when you finish. Signing out removes your data from that computer's browser. It stays safe in your account.
The first time you sign in
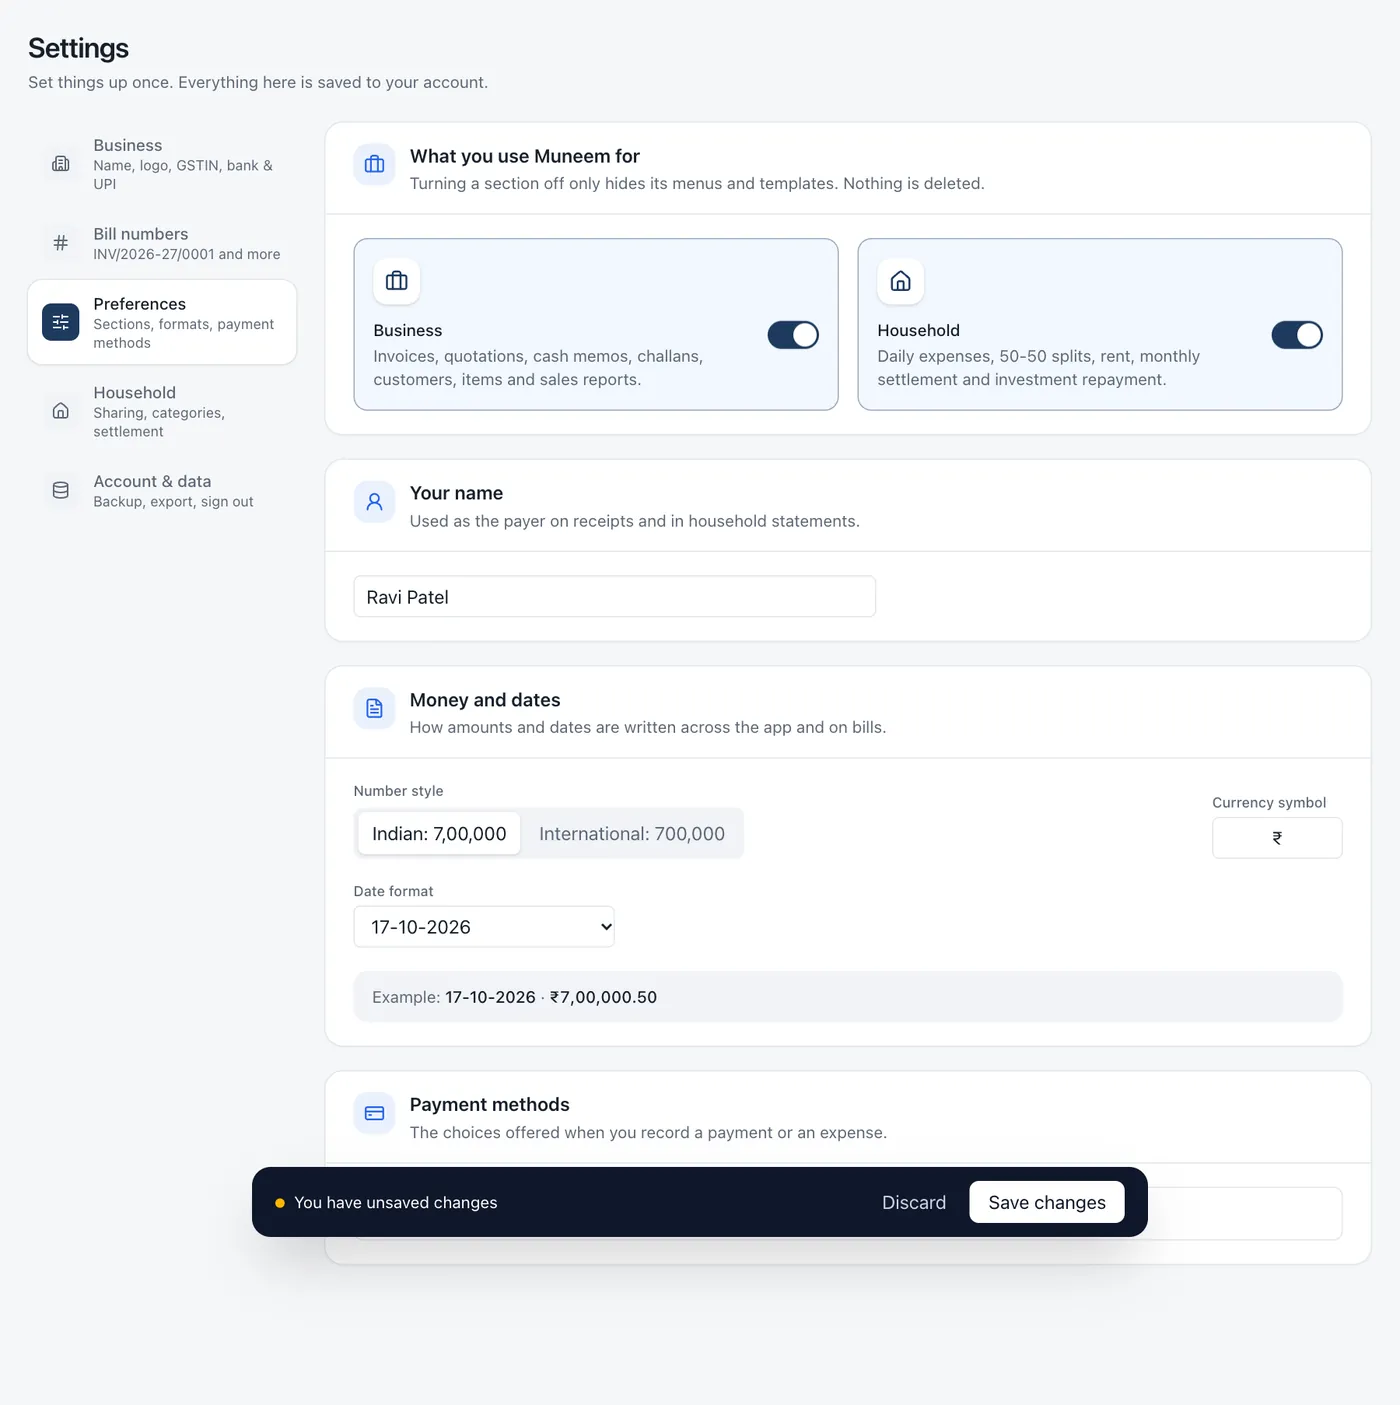
The app asks what you'll use it for. This only decides which menus you see, and you can change it later in Settings.
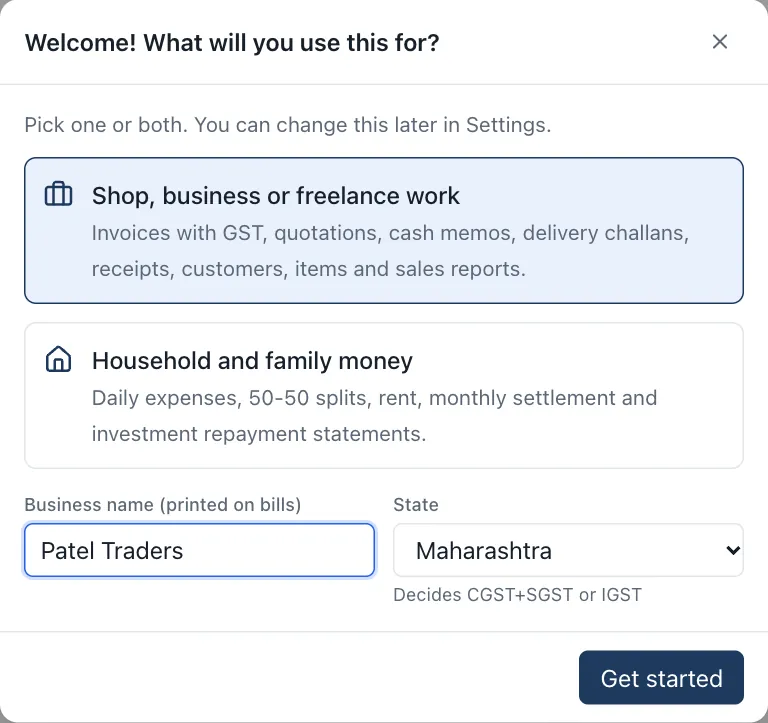
- Shop, business or freelance work shows invoices, quotations, cash memos, delivery challans, customers, items and sales reports. Type your business name and state.
- Household and family money shows daily expenses, 50-50 splits, rent, settlements and investment repayment (sections 9 to 15).
If you used this app on the same browser before accounts existed, it offers to import that earlier data into your account. Press Import into my account to keep it.
2. Setting up your business
Do this once. It takes about five minutes, and everything you enter prints automatically on your bills.
Go to Settings. The page has tabs down the left (across the top on a phone): Business, Bill numbers, Preferences, Household (when switched on) and Account & data. Start with Business.
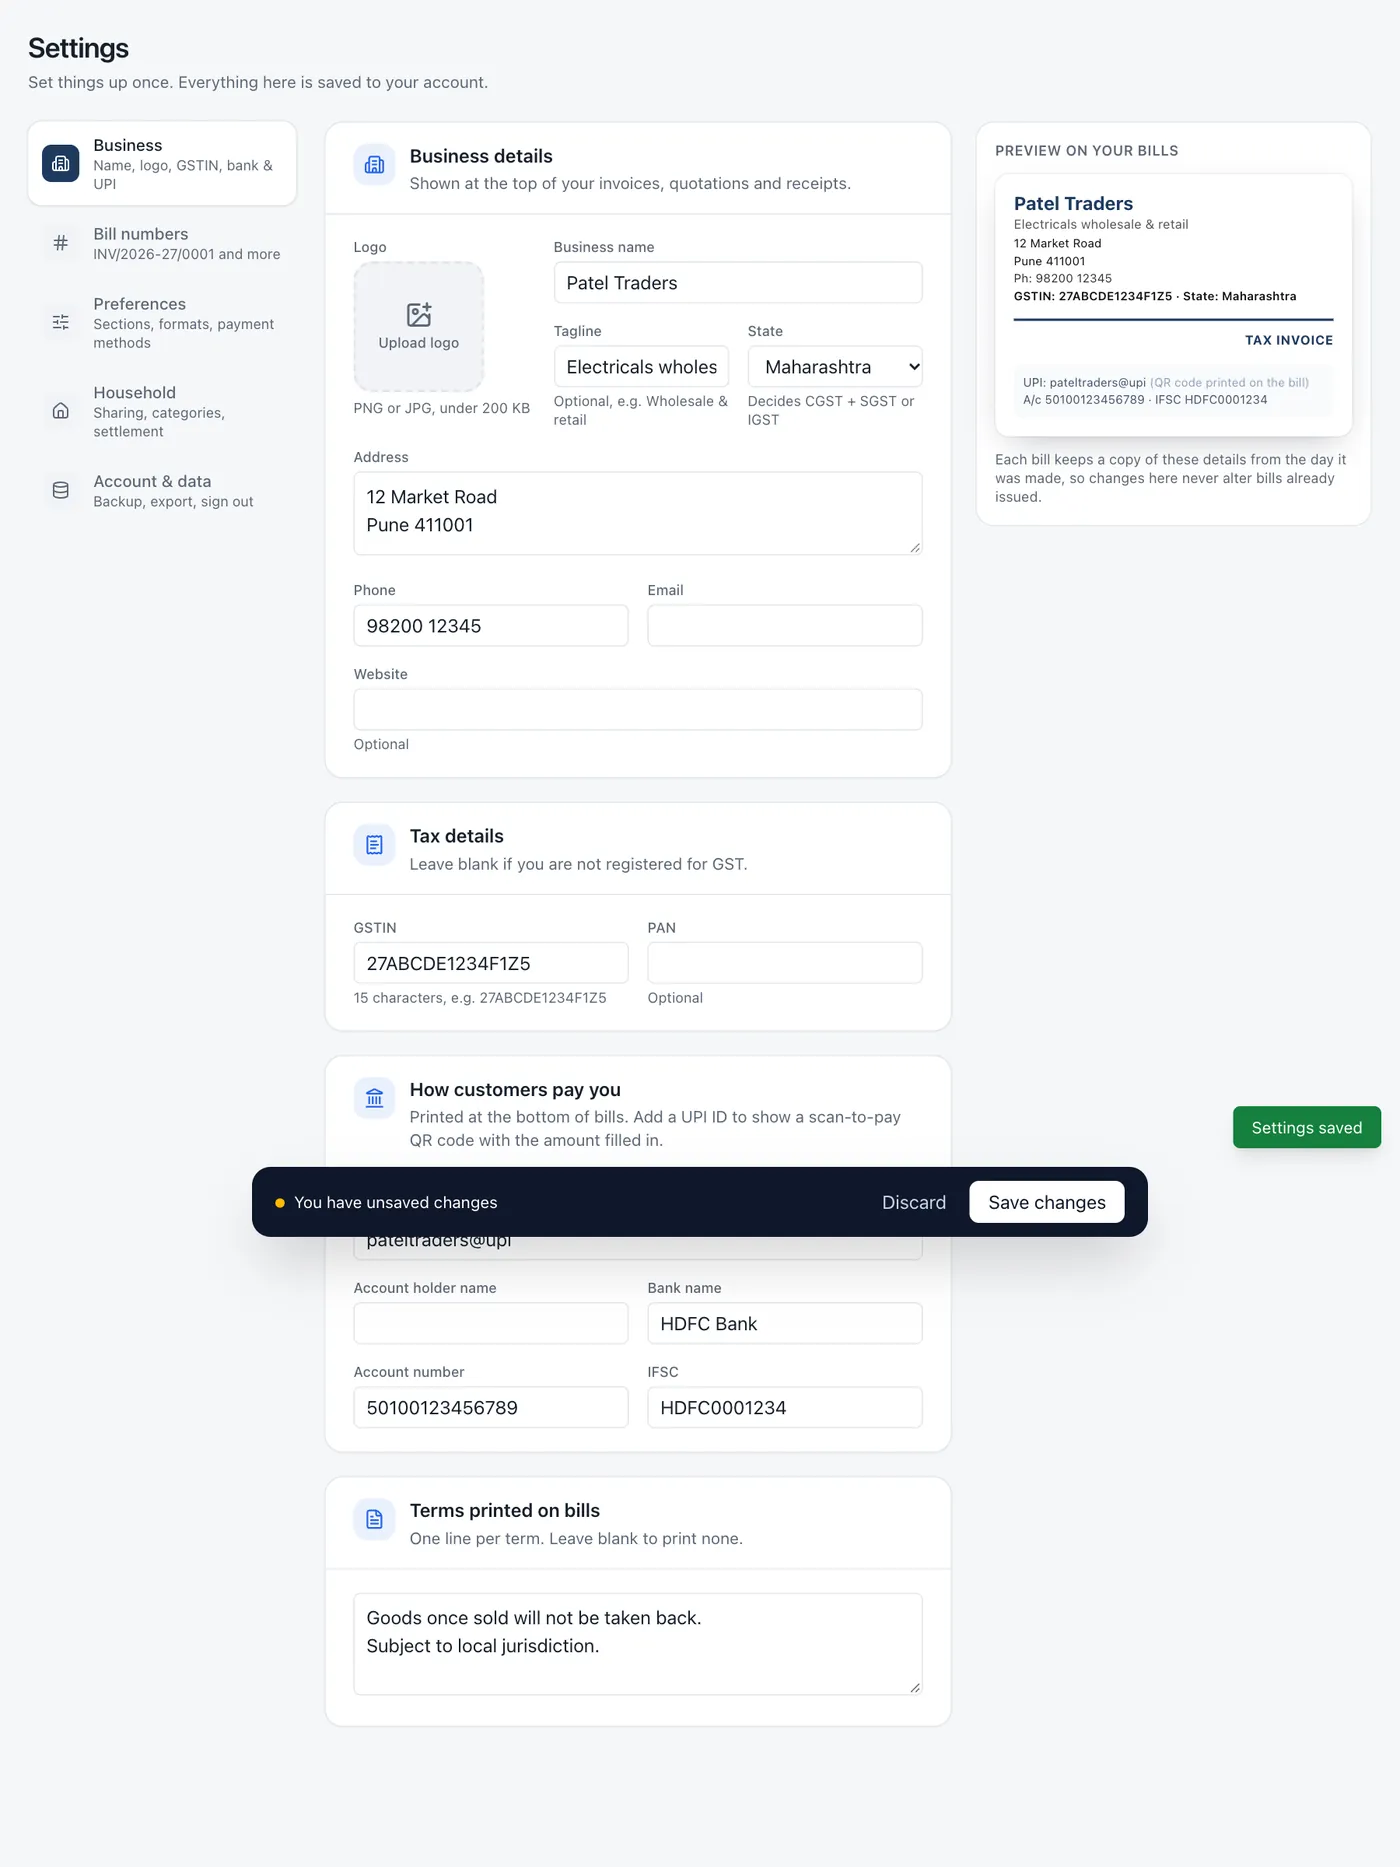
- Business name, address, phone, email, website appear at the top of every bill.
- State decides the tax: when your customer is in the same state the app charges CGST + SGST, otherwise IGST.
- GSTIN and PAN print under your name. The app checks the GSTIN has the right format.
- Logo: a small image under 200 KB.
- Bank details and UPI ID print at the bottom of bills. With a UPI ID, bills also show a scan-to-pay QR code with the amount already filled in.
- Terms print at the bottom, for example "Goods once sold will not be taken back."
The box on the right shows how the top of your bills will look as you type. When you change anything, a bar slides up at the bottom of the screen: press Save changes (or Discard to undo). If you try to leave with unsaved changes, the app warns you.
Each bill keeps a copy of these details from the day it was made. If you move shop later, old bills still show the old address.
Bill numbers
Every invoice, quotation and receipt gets the next number automatically. Open the Bill numbers tab to choose how the numbers look. There is one card per kind of bill, and the blue badge shows exactly what the next number will be.
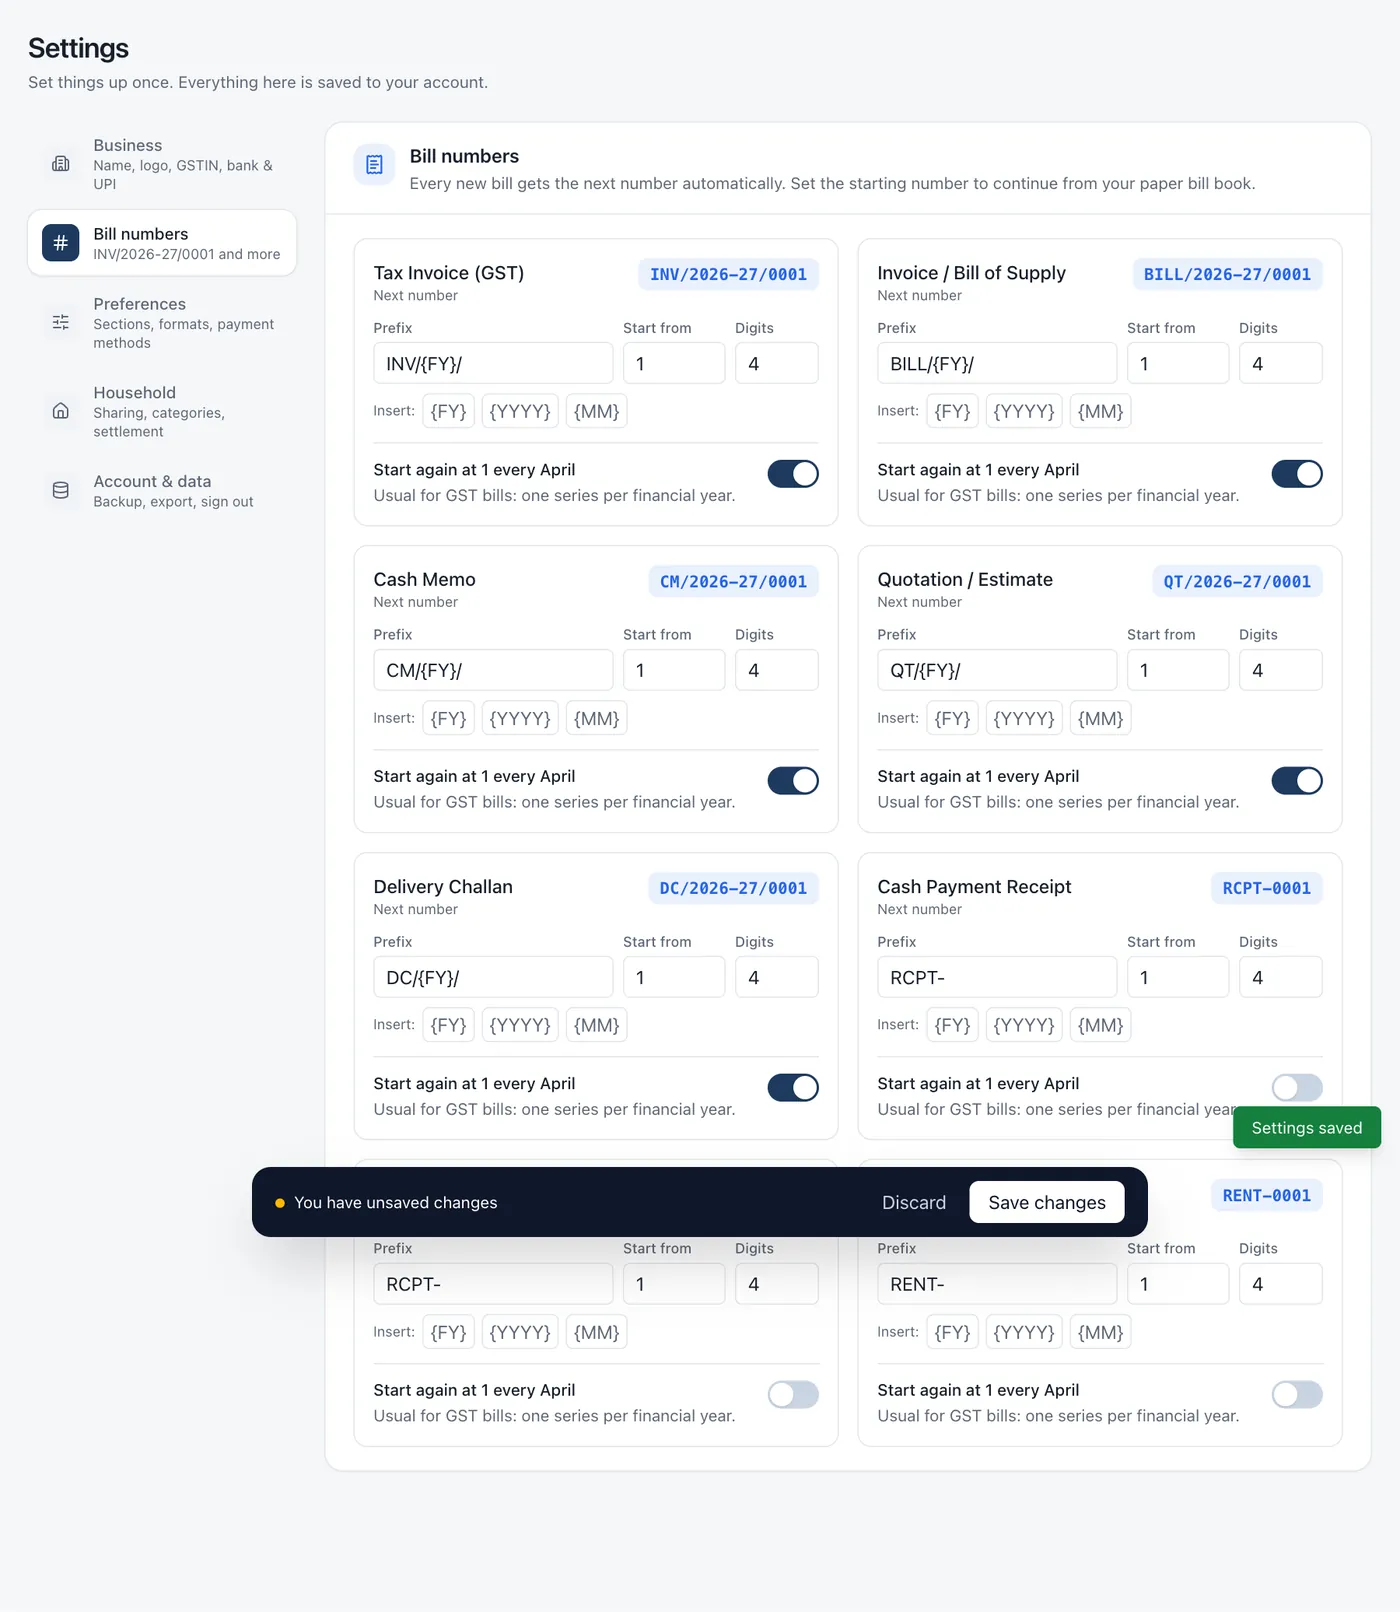
- Prefix: text before the number. Click {FY}, {YYYY} or {MM} to insert the financial year (2026-27), the year or the month.
INV/{FY}/givesINV/2026-27/0001. - Start from: the number the next bill will get. Set this if you're moving from a paper bill book.
- Digits: 4 gives 0001.
- Start again at 1 every April: one series per financial year, the usual choice for GST bills.
What you use Muneem for
The Preferences tab has a switch for each part of the app: Business and Household. Turning one off only hides its menus and templates; nothing is deleted. The same tab holds your name, the number and date style (with a live example), and your list of payment methods: type a new one and press Enter, or click × to remove one.
3. Customers and items
Save your regular customers and your price list once, then pick them on any bill.
Customers
Go to Customers and press Add customer.
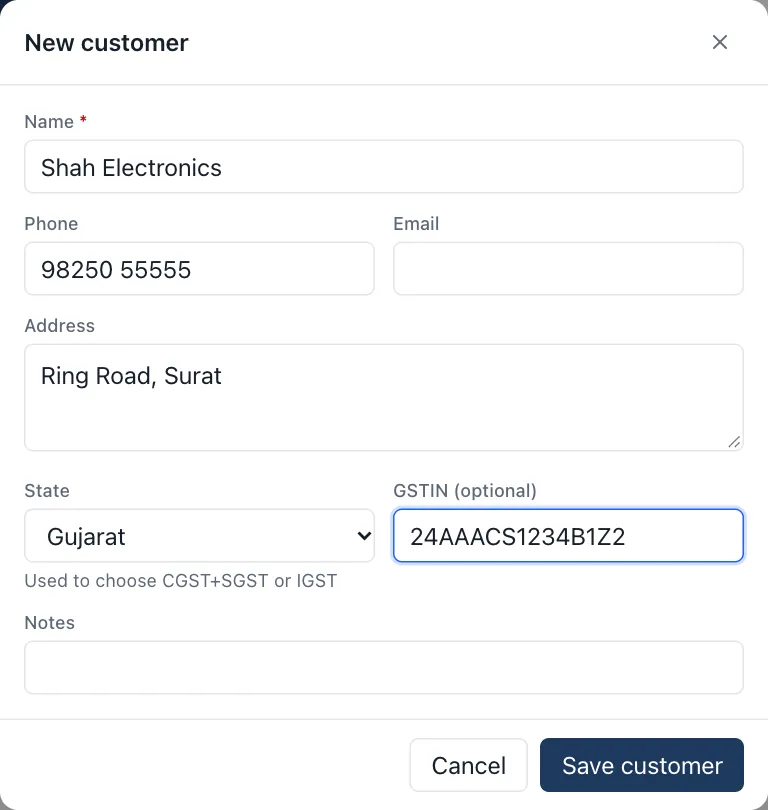
Enter the name, phone, address, state and GSTIN (optional). The state matters: it decides CGST + SGST or IGST.
Items & services
Go to Items & services and press Add item. Enter the name, rate, unit (pcs, kg, hr and so on), GST rate and HSN or SAC code.
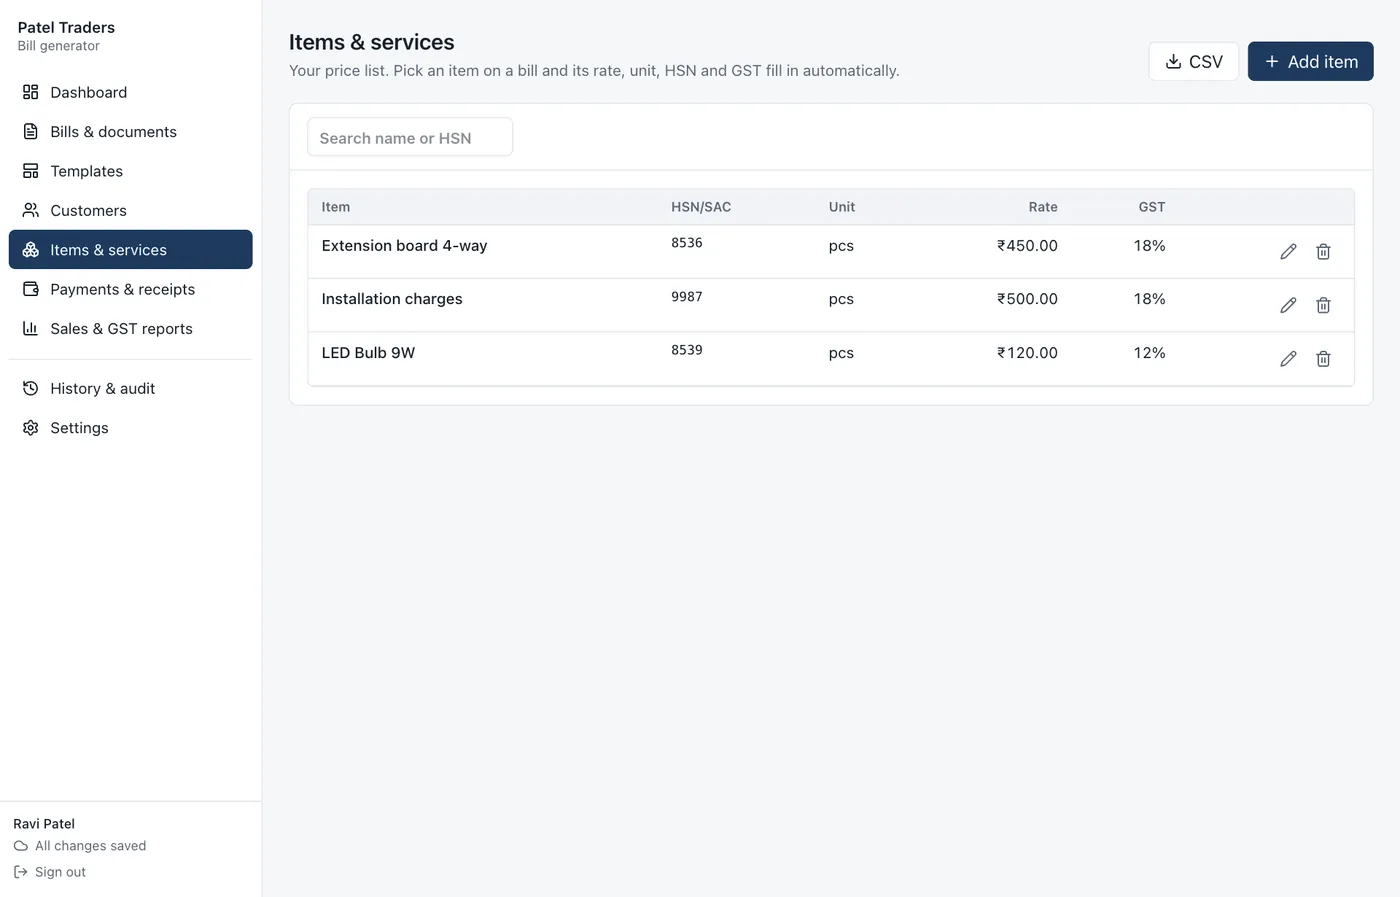
Both lists can be searched and exported to CSV. Editing or deleting a customer or item never changes bills already made, because each bill keeps its own copy.
4. Making a bill
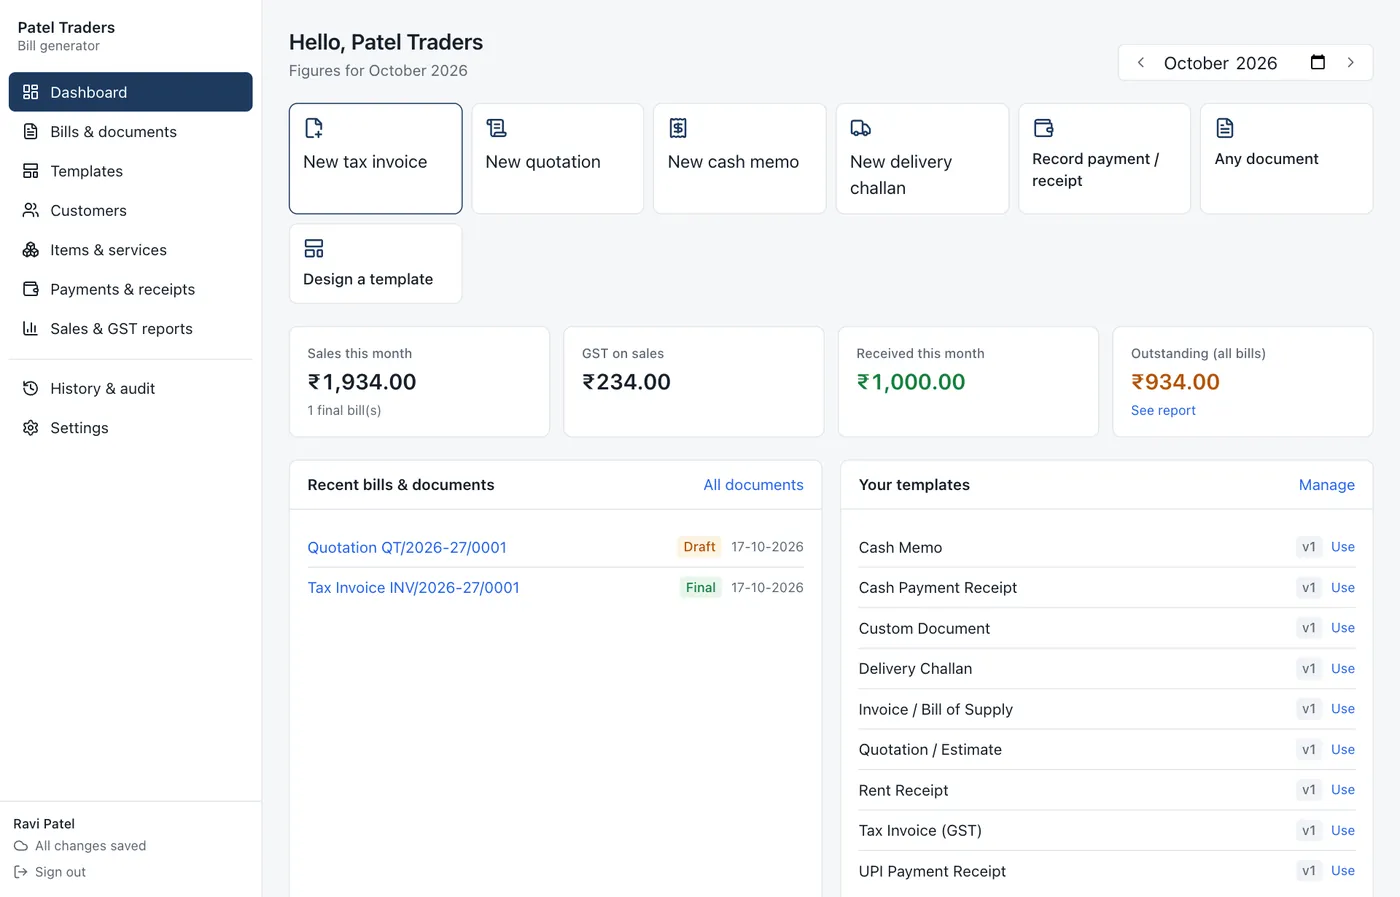
The Dashboard has one-click buttons for the most common bills: New tax invoice, New quotation, New cash memo and New delivery challan. For anything else, press Any document and pick a template.
The bill opens with the form on the left and the printed page on the right. The page updates as you type.
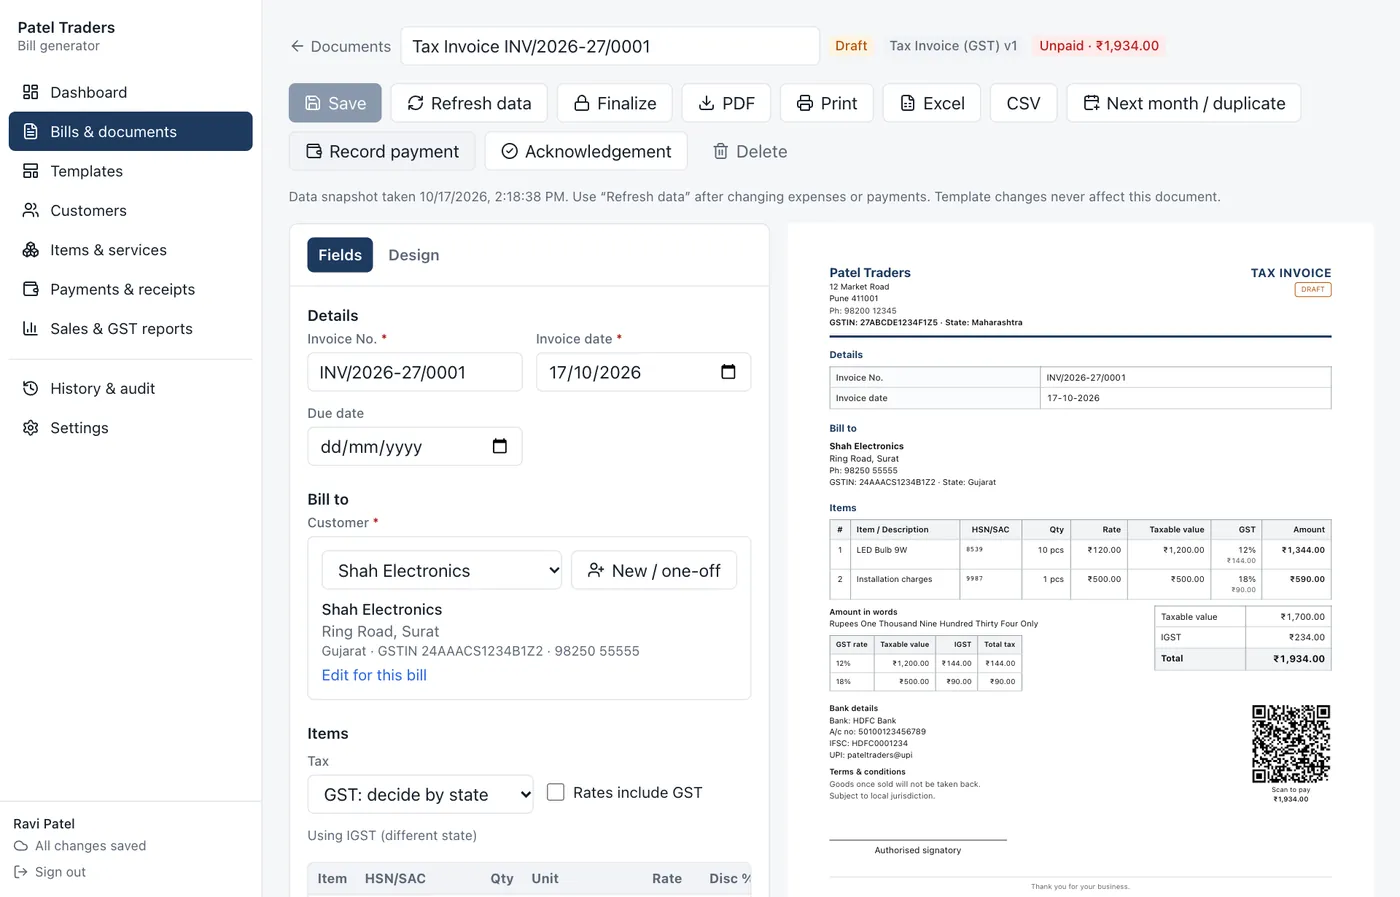
- Number and date. The number is filled in from your number series. The date is today; change it if needed.
- Customer. Choose a saved customer. For a one-time customer, press New / one-off and type their details; Save to customers keeps them for next time. A cash memo can be left blank for walk-in customers.
- Items. Start typing an item name and pick it from the list: rate, unit, HSN and GST fill in. Change the quantity. Add more lines with Add line. A new item typed by hand can be saved to your list with the disk icon.
- Tax. Normally leave it on GST: decide by state; the app shows whether it is using CGST + SGST or IGST. Choose No GST for a bill of supply. Tick Rates include GST if your prices already include tax (common in retail); the app works the tax out backwards.
- Notes, if any, then Save.
The printed bill shows your business details, the customer, each line with taxable value and GST, a tax summary by rate, any round-off, the total, the amount in words, bank details, the UPI QR code and your terms.
Ready-made bill types
| Template | Use it for |
|---|---|
| Tax Invoice (GST) | Sales with GST. Has HSN/SAC, tax summary, bank details and UPI QR. |
| Invoice / Bill of Supply | Sales without GST. |
| Cash Memo | Quick counter sales. Prices include GST; customer optional. |
| Quotation / Estimate | Prices before a sale. Can be turned into an invoice (below). |
| Delivery Challan | Goods sent without prices. Shows quantities only. |
| Cash / UPI Payment Receipt | Proof of a payment received (section 6). |
| Rent Receipt | Monthly rent received. |
| Custom Document | A blank page to design anything (section 8). |
Turning a quotation into an invoice
Open the quotation and press Convert to invoice, then pick the invoice template.
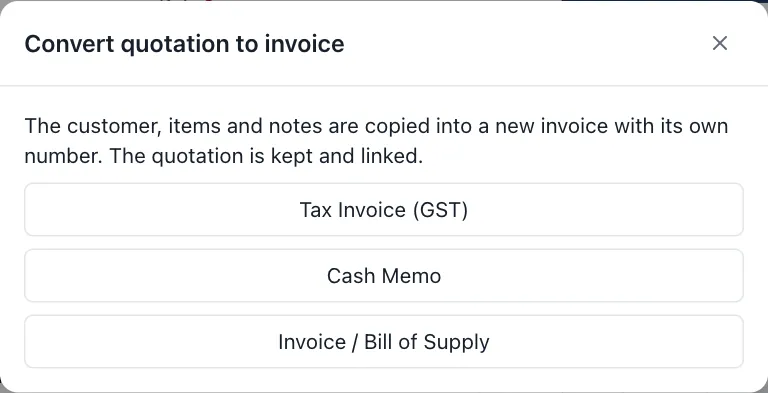
A new invoice opens with the same customer, items and notes and the next invoice number. The quotation is kept and linked to it (View invoice on the quotation, From quotation on the invoice).
5. Saving, finalizing and printing any document
Every bill, statement and receipt has the same toolbar.
Fields tab. Fill in anything typed by hand. Fields with a red star are required. Calculated amounts fill in automatically.
Design tab. Change the title, subtitle, language, font, font size, margins, table borders, colour, header, footer, declaration text and signature lines, and whether to show your business details, bank details, UPI QR and terms. Changes here affect only this document. To change future documents, edit the template instead (section 8).
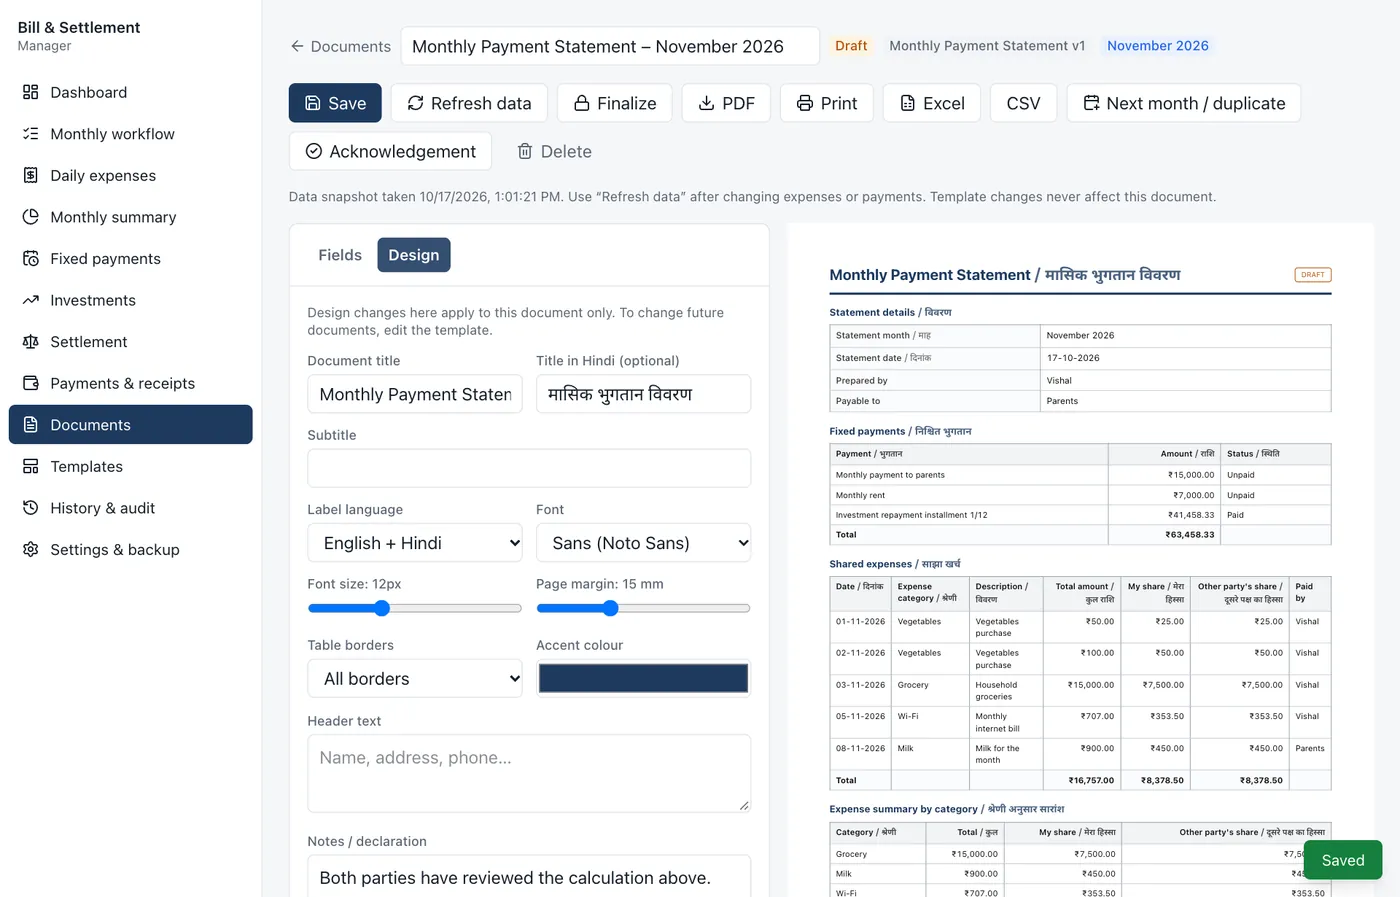
Toolbar buttons:
| Button | What it does |
|---|---|
| Save | Saves your changes. |
| Refresh data | Re-reads your latest records into a draft (used by household statements). |
| Finalize | Locks the document. Its contents never change again, even if you later edit customers, items or templates. A DRAFT mark shows on the page until you finalize. Issue a bill only once it's final. |
| Reopen | Turns a final document back into a draft. The change is logged. |
| Downloads an A4 PDF. | |
| Opens your browser's print window. | |
| Excel / CSV | Downloads the tables in the document, including each item line with its tax. |
| Next month / duplicate | Makes a fresh copy with a new number, using either the latest template or exactly this layout. |
| Record payment | On invoices: records money received against this bill (section 6). |
| Convert to invoice | On quotations (section 4). |
| Acknowledgement | Records that the customer or other person received and accepted it, with name, date and a note. It's printed on the document. |
| Delete | Removes the document. |
Next to the title, invoices show Unpaid, Part paid (with the amount still due) or Paid.
Hindi in PDFs. The PDF button always shows Hindi correctly, but the text in that PDF is a picture, so you can't select or copy it. If you need selectable text, press Print and choose Save as PDF as the printer.
6. Payments, receipts and part payments
Getting paid for an invoice
Open the invoice and press Record payment. The amount still due is filled in; change it for a part payment.
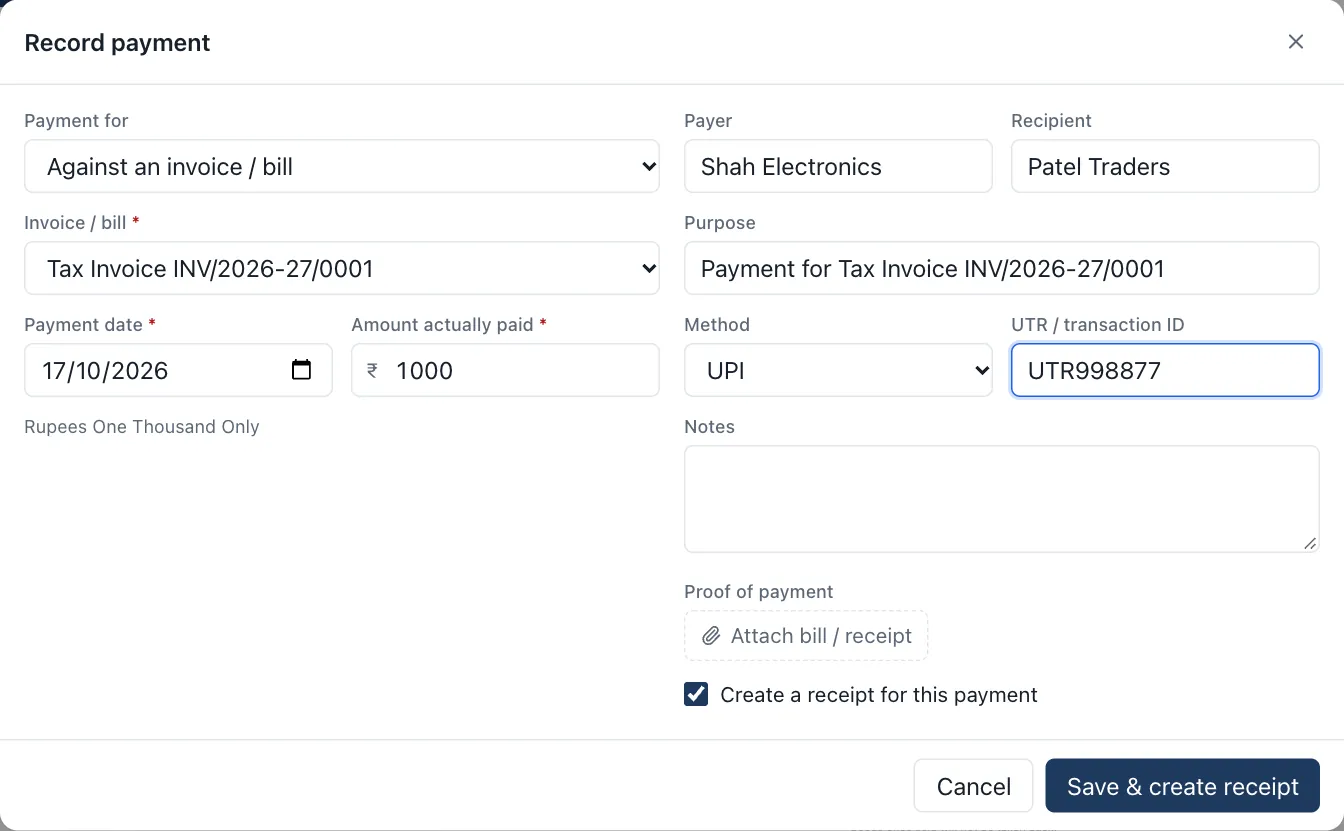
Enter the date, method and UTR number. Leave Create a receipt for this payment ticked to make a receipt straight away. The invoice then shows Part paid with the balance, or Paid.
You can also record any payment from Payments & receipts > Record payment and choose Against an invoice / bill.
Receipts are only for money actually received
A receipt is always created from a recorded payment, never from an amount that has only been promised. The receipt fills itself in: receipt number, date, payer, recipient, amount in figures and words, purpose, method, UTR and remaining balance. UPI and bank transfers use the UPI receipt layout; cash uses the cash receipt layout.
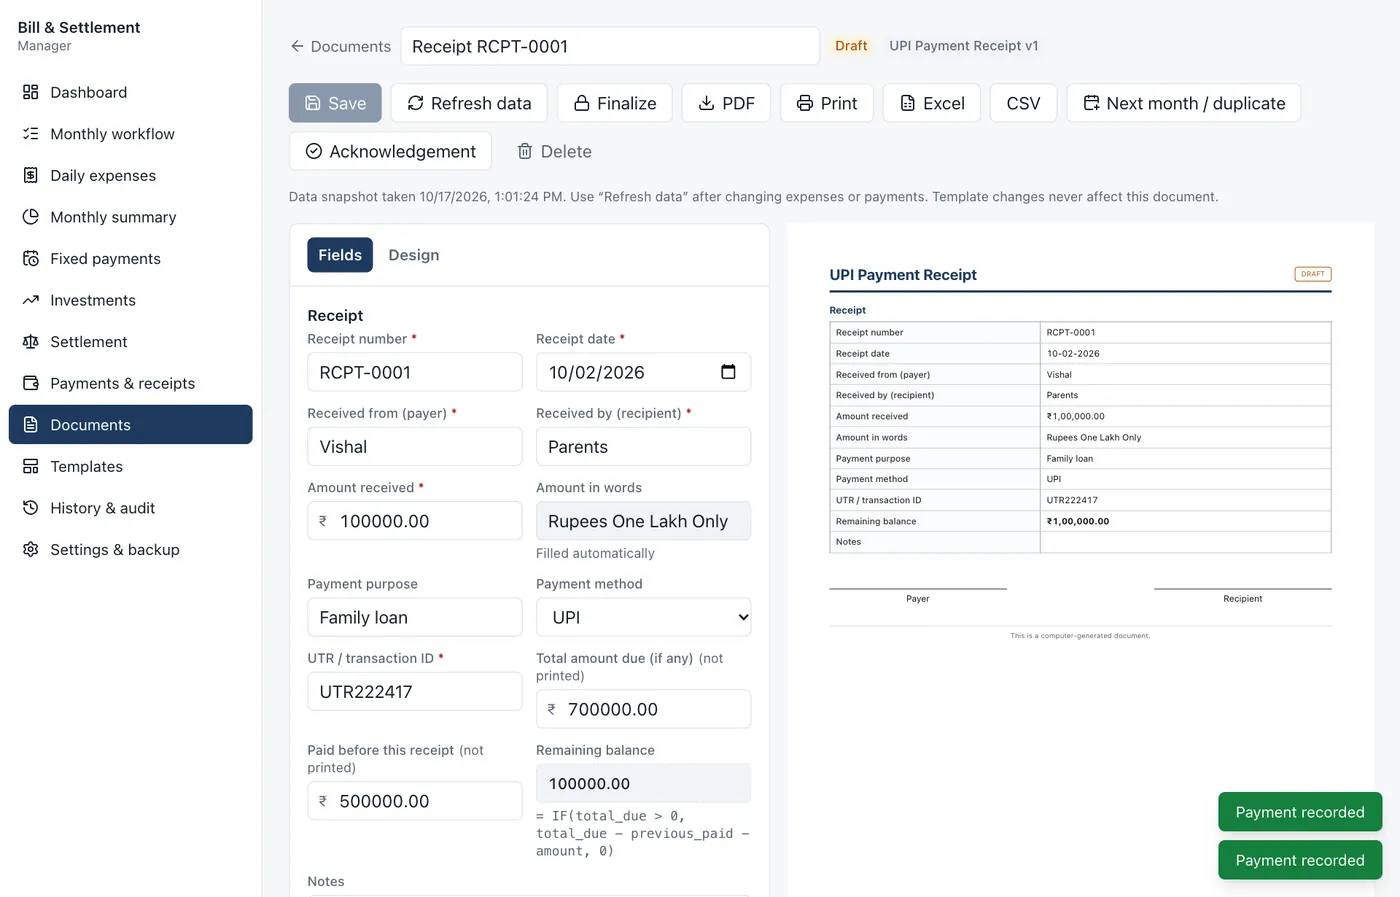
For an older payment without a receipt, press Create in the Receipt column of the payment history.
Paying off a larger amount in parts
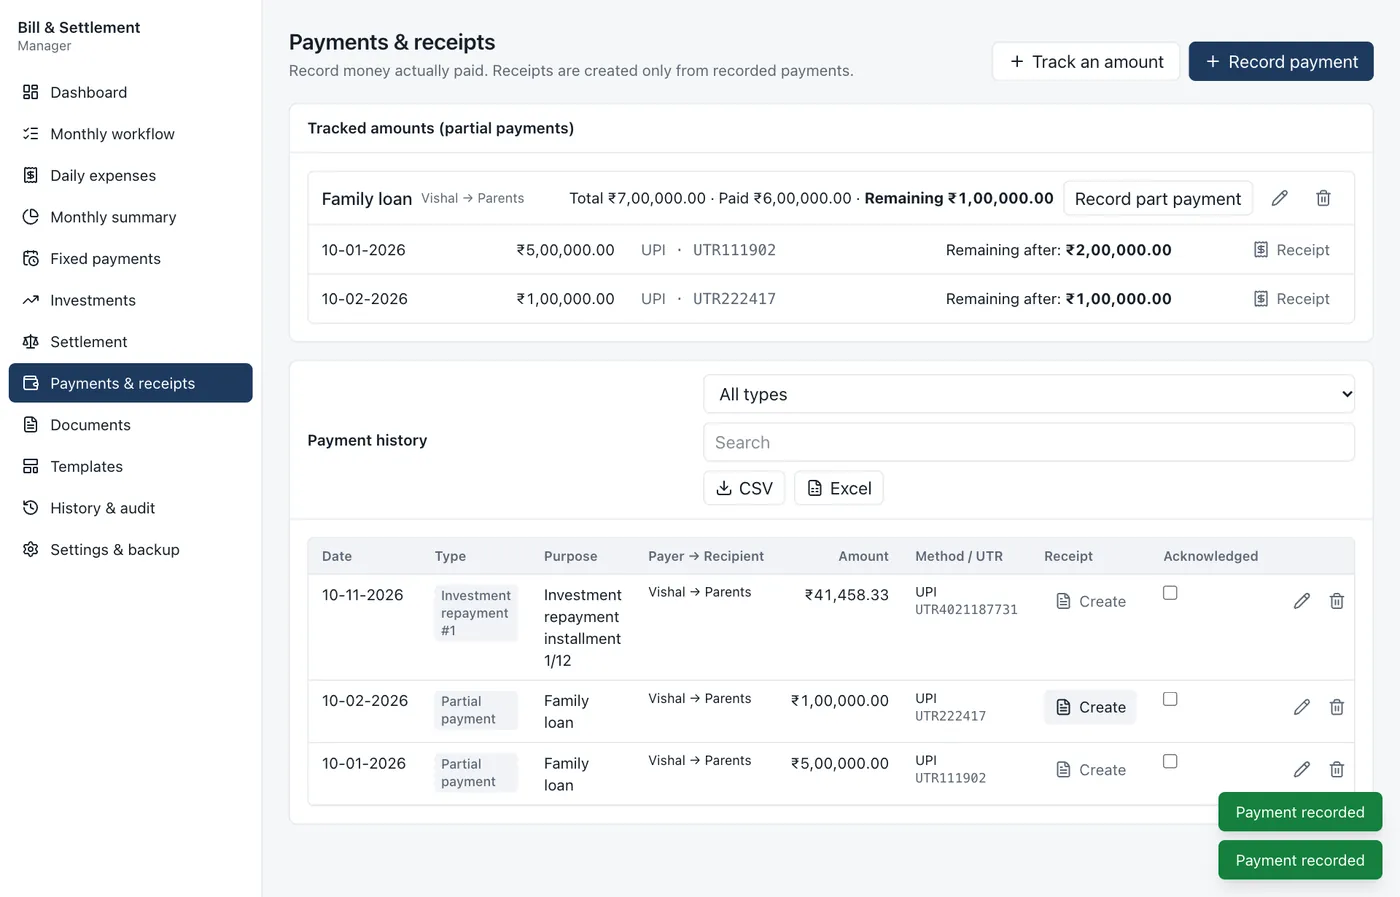
To track a total that's being paid in instalments outside an invoice (for example a ₹7,00,000 loan), go to Payments & receipts:
- Press Track an amount, give it a title and enter the total.
- Each time money is paid, press Record part payment on it.
The app shows the remaining balance after each payment. Paying ₹5,00,000, then ₹1,00,000, then ₹1,00,000 leaves ₹2,00,000, then ₹1,00,000, then ₹0. Each receipt prints the remaining balance at that point.
Payment history
The lower list on Payments & receipts shows every payment. Filter by type or search by name or UTR. Tick Acknowledged once the recipient confirms they got the money. Export with CSV or Excel.
"Possible duplicate" appears if another payment already uses the same UTR number. Check it isn't entered twice. If it really is separate, press Save anyway.
7. Sales & GST reports
Go to Sales & GST reports. Choose a month, a financial year or custom dates. Only final bills are counted; tick Include drafts to see drafts too.
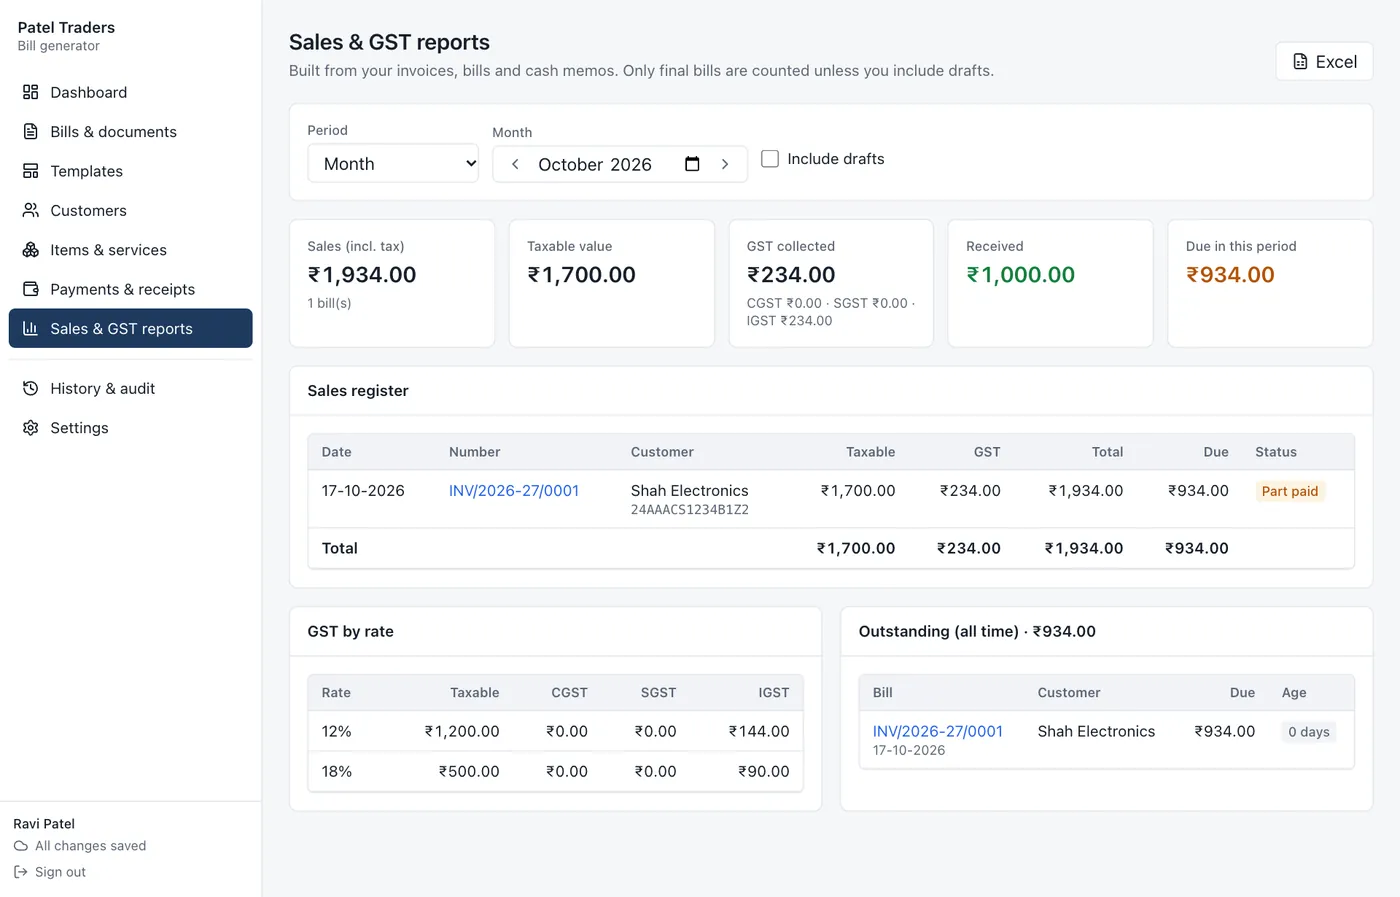
- Totals: sales including tax, taxable value, GST collected (CGST, SGST and IGST), money received, and the amount still due.
- Sales register: every invoice, bill and cash memo with its customer, GSTIN, taxable value, GST, total and payment status.
- GST by rate: taxable value and tax at each rate (5%, 12%, 18% and so on), useful when filing returns.
- Outstanding: every unpaid or part-paid final bill, with how many days old it is.
Press Excel to download all three as one workbook for your accountant.
8. Designing your own templates
Every bill, statement and receipt comes from a template. Changing a template changes all future documents made from it. Documents you've already created keep their own copy and never change.
Go to Templates.
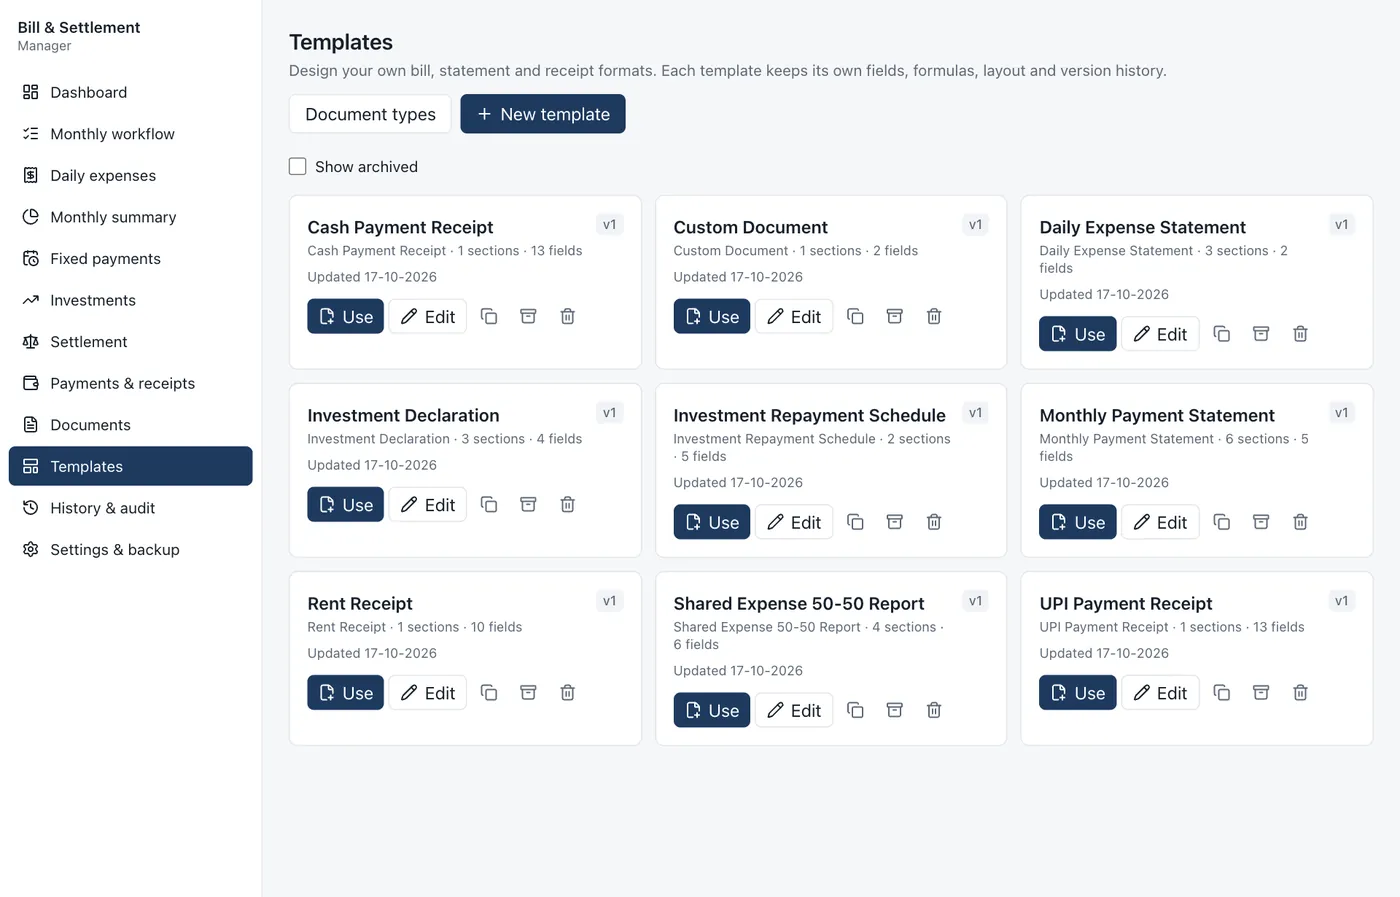
The app includes ready-made templates for business bills (Tax Invoice, Invoice / Bill of Supply, Cash Memo, Quotation, Delivery Challan), receipts (cash, UPI, rent), household statements, and a blank Custom Document. Templates for a section you've switched off are hidden; tick Show templates for modules that are switched off to see them.
On each template card:
- Use creates a new document from it.
- Edit opens the template builder.
- The copy icon duplicates it, the box icon archives it, and the bin deletes it.
New template lets you start from a blank page, a built-in template, or one of your own. Document types lets you add your own types, such as "Maintenance Bill".
The template builder
The left side is where you edit. The right side shows a live preview using your real data for the chosen month.
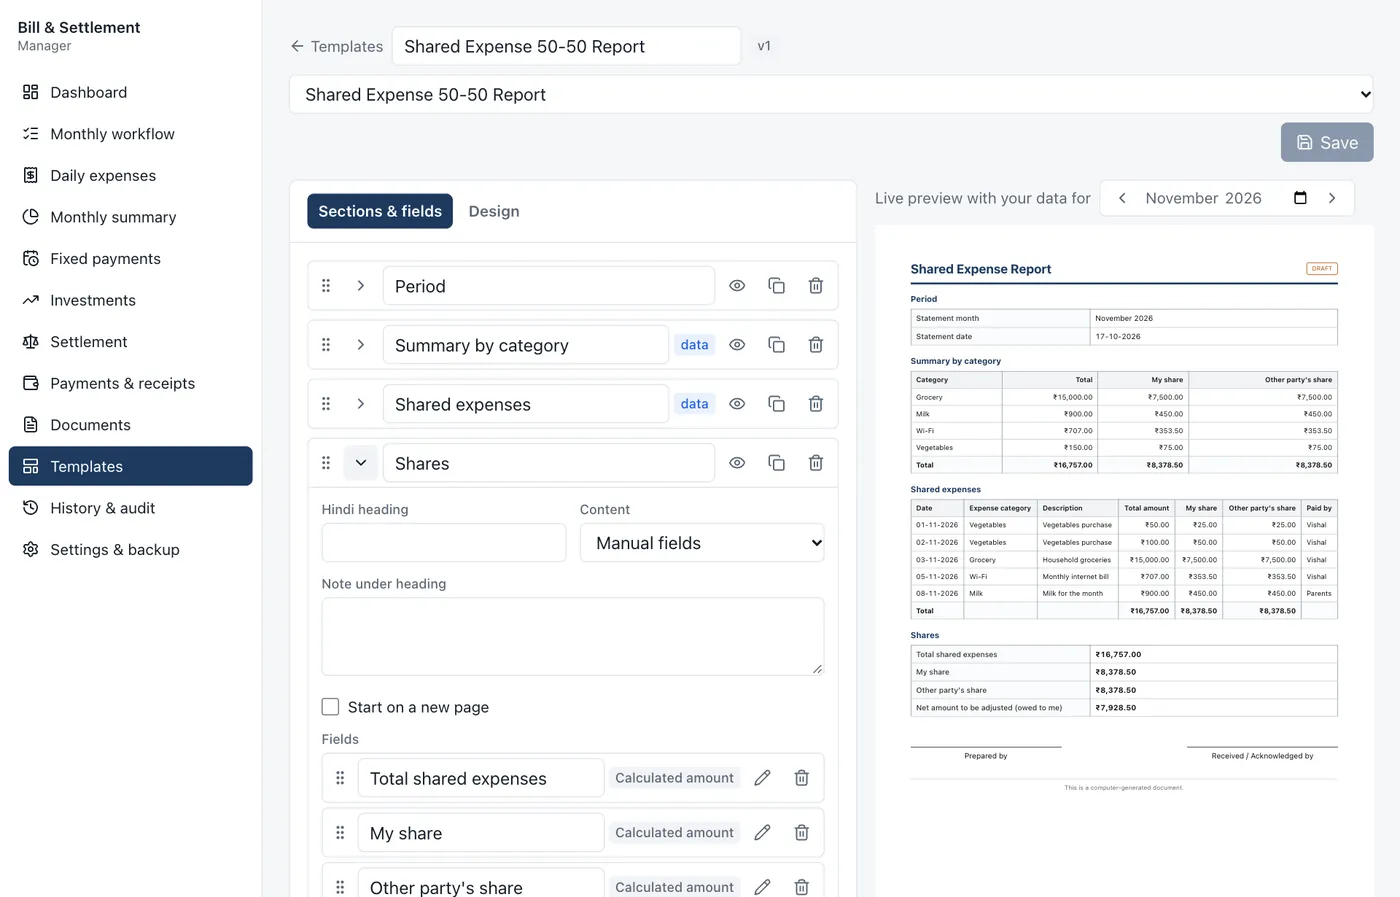
Sections are the headed blocks of the document. For each section you can:
- Rename it by typing over the heading. Open it with the arrow (›) to add a Hindi heading or a note.
- Drag the ⠿ handle to move it up or down.
- Hide it with the eye icon. It stays in the template but isn't printed.
- Duplicate or delete it.
- Tick Start on a new page to force a page break before it.
- Choose its Content: either Manual fields that you type into, or live data from the app, such as expenses for the month, fixed payments, totals by category, the settlement calculation, investments, the repayment schedule or payments.
Fields are the individual boxes inside a section. Press Add field, then the pencil icon to set it up:
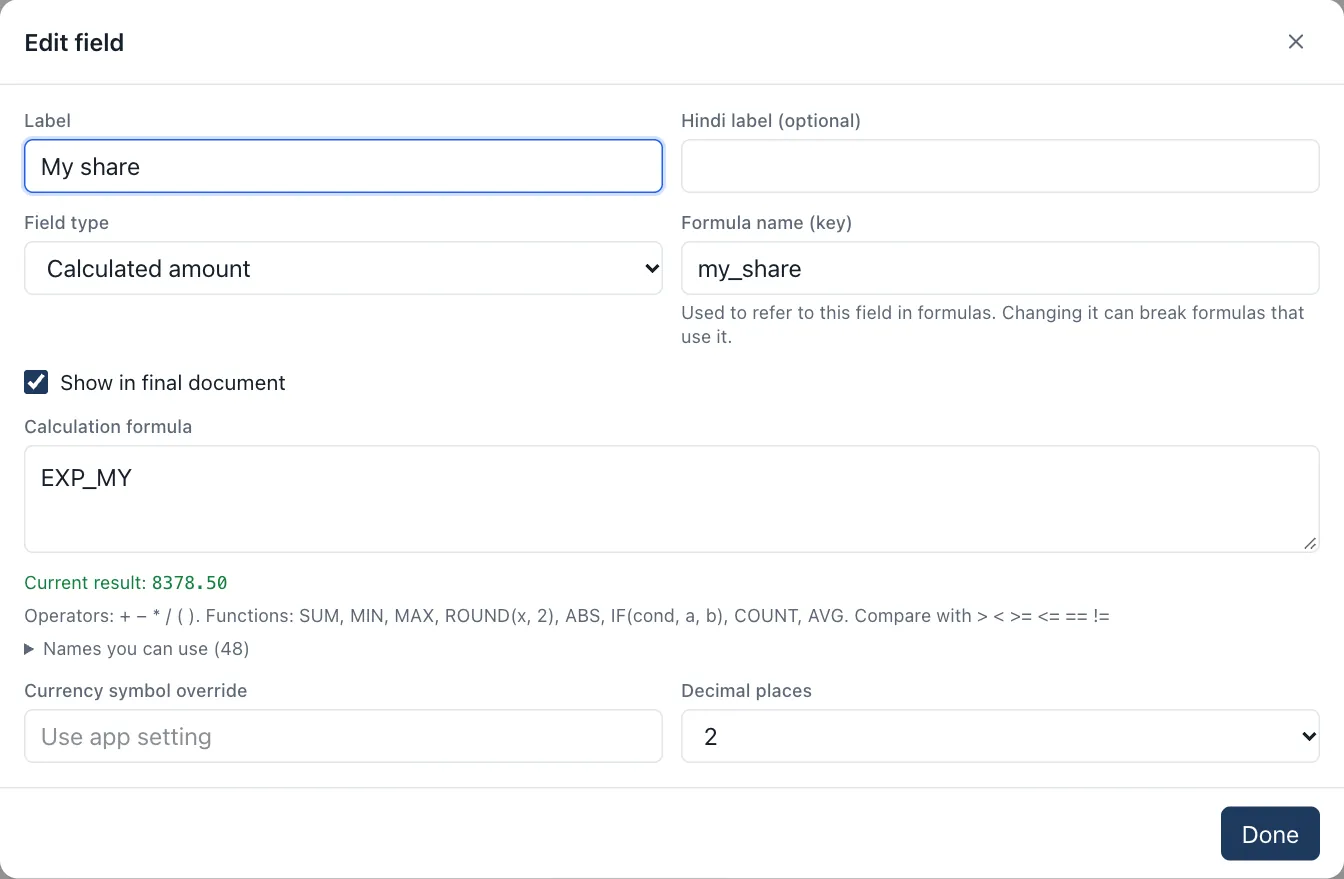
| Setting | Meaning |
|---|---|
| Label / Hindi label | The text printed beside the value. Renaming "Parents' 50% Share" to "Shared Expense Split" is just a matter of typing the new label. |
| Field type | Short text, long text, number, currency, date, month and year, dropdown, checkbox, percentage, calculated amount, signature, file attachment, UTR reference, repeating table, items with qty, rate & GST, or customer. |
| Formula name (key) | The short name used to refer to this field in formulas. Leave it alone unless you write formulas. |
| Placeholder / Default value | Hint text, and a value filled in automatically. |
| Required | The document can't be finalized until it's filled in. |
| Auto-number | For text fields: fills in the next number from the document type's number series (section 2). |
| Show in final document | Untick to keep a field for working out only, without printing it. |
| Calculation formula | For calculated amounts. The box shows the current result as you type, and lists every name you can use. |
Changing table columns
For sections showing live data (and for repeating tables), you choose the columns:
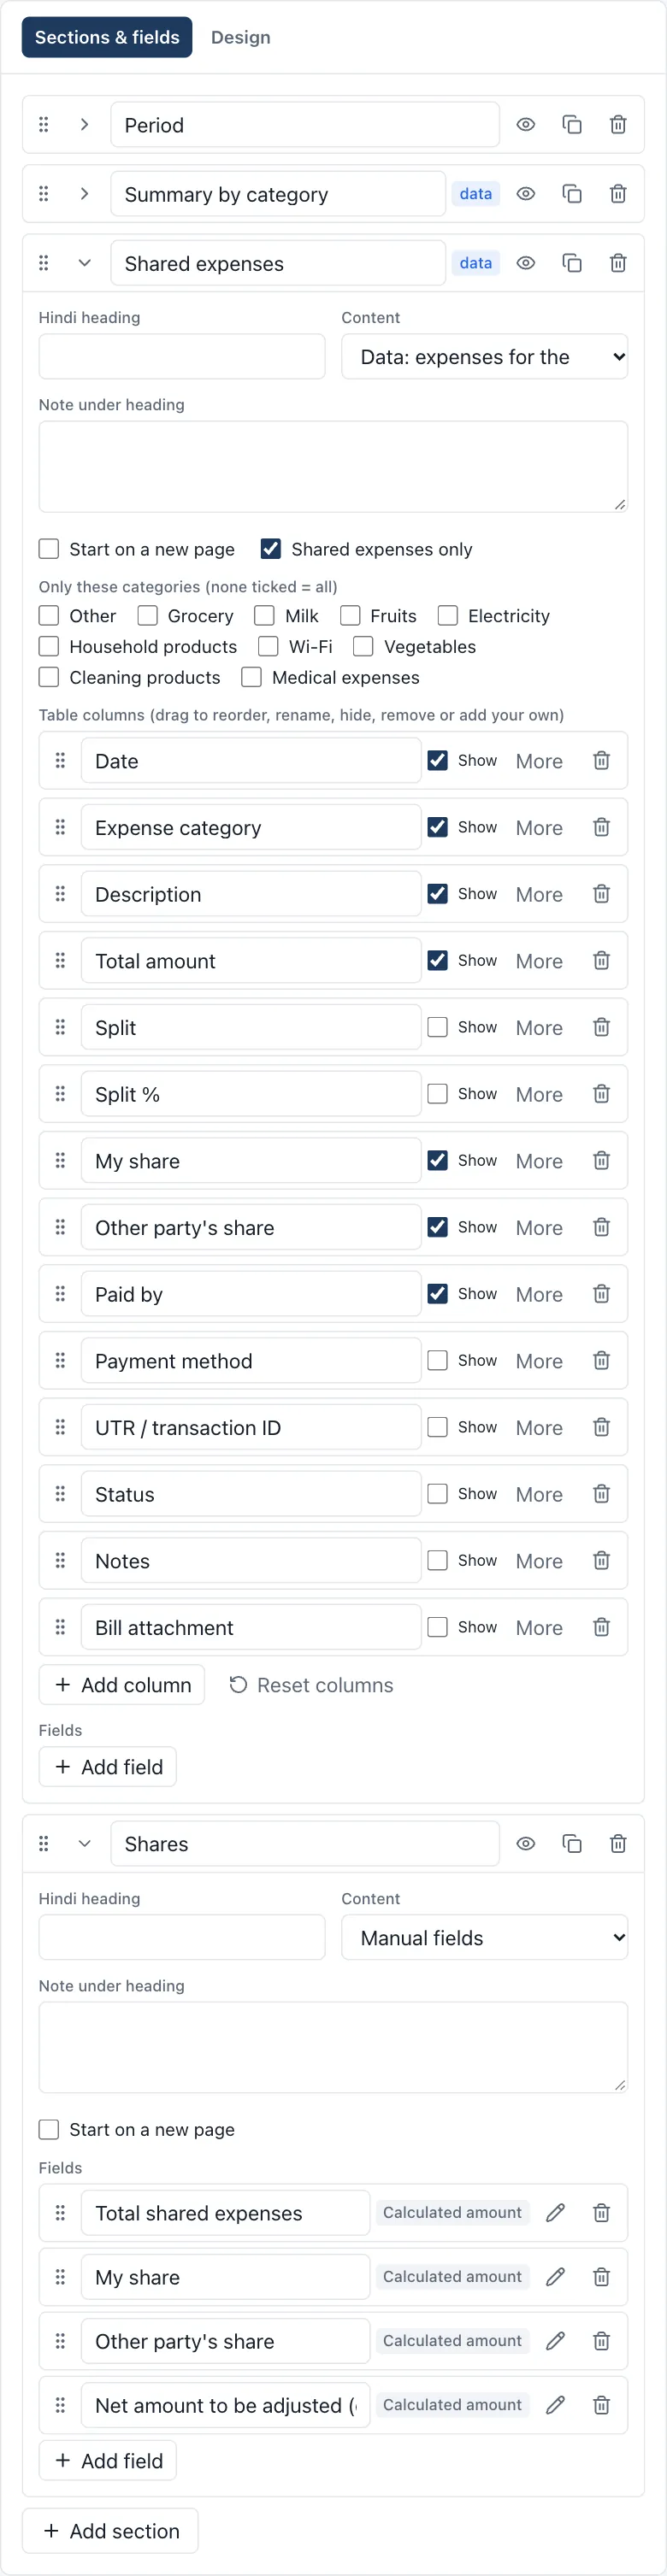
- Rename a column by typing over its heading.
- Show turns it on or off. For example, turn on UTR / transaction ID or Bill attachment, or turn off Paid by.
- Drag ⠿ to reorder, and the bin removes a column.
- More gives a Hindi heading, the column type, whether to total it, and an optional row formula.
- Add column creates your own column. Give it a row formula such as
amount * 0.18to calculate it, or leave the formula empty. - Reset columns puts the original columns back.
For expense sections you can also tick Shared expenses only, or limit the section to particular categories.
Items fields
An Items with qty, rate & GST field gives you the full invoice table. In its settings you choose the default tax (decide by state, CGST + SGST, IGST or no GST), whether rates include GST, round-off to the nearest rupee, and which columns show: HSN/SAC, unit, discount, the tax summary, and prices (turn prices off for a delivery challan). Formulas elsewhere in the template can use GRAND_TOTAL, TAXABLE, CGST, SGST, IGST, TAX_TOTAL, DISCOUNT, ROUND_OFF, SUBTOTAL and TOTAL_QTY.
Saving a template
Press Save and choose one of:
- Update this template: changes the template in place.
- Save as a new version: keeps the old version and adds a new one (v2, v3 and so on). Older versions stay listed on the template card.
- Save as a separate new template: a completely separate copy.
Whichever you pick, documents already created are not changed.
Changing the settlement formula
In Settings > Household, open Advanced: settlement formula at the bottom. You can change the name of the final amount and the formula used for it. Each available value is listed with this month's figure, and the box shows the result as you type. The Settlement page's Edit formula link opens this straight away.
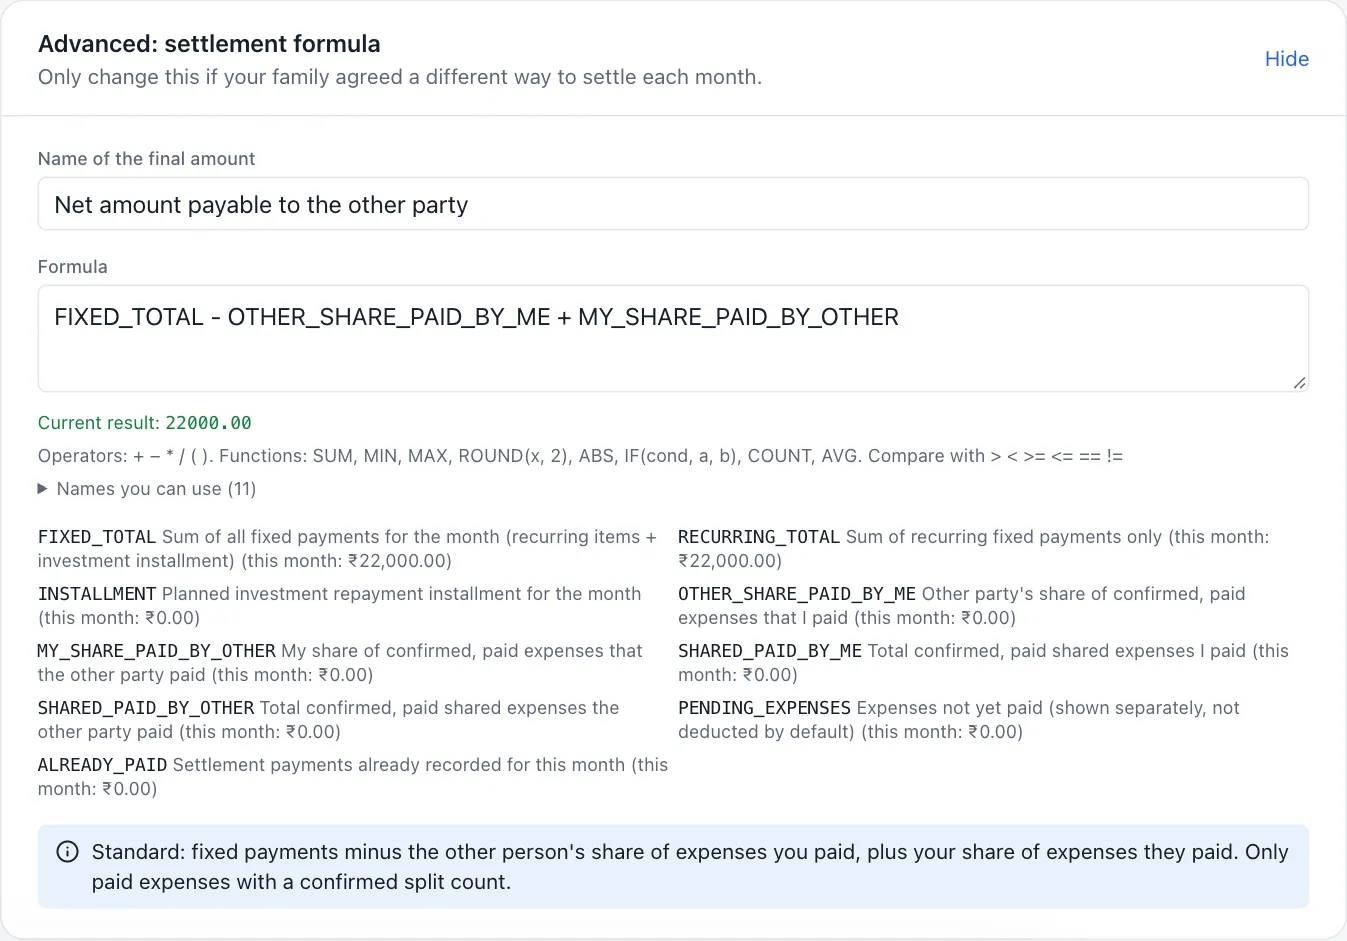
If you make a mistake, press Reset to the standard formula.
Hindi labels
Every heading, field, column and signature can have a Hindi label. In the Design tab, set Label language to Hindi, or to English + Hindi to show both side by side.
Household module. Sections 9 to 15 apply when Household is switched on in Settings. They cover daily expenses, sharing them with family or flatmates, fixed payments like rent, investment repayment and the monthly settlement.
9. Household: first-time setup
Do this once. It takes about ten minutes.
Step 1: Your names
Go to Settings. Type your own name under Preferences > Your name, and the other person's name (for example "Parents") under Household > Who you share with. These names appear throughout the app and on printed bills. Press Save changes in the bar at the bottom.
The Household tab also holds the usual sharing rule, the expense categories and the investment categories. Receipt numbers (for example RCPT-0001) are set under Bill numbers (section 2).
Step 2: Expense categories
The app starts with common categories: Vegetables, Grocery, Milk, Fruits, Wi-Fi, Electricity, Cleaning products, Household products, Medical expenses and Other.
To change them, go to Daily expenses and press Categories. You can add, rename, reorder (with the arrows), or delete a category. A category that's already used by expenses is archived instead of deleted, so your old records stay intact.
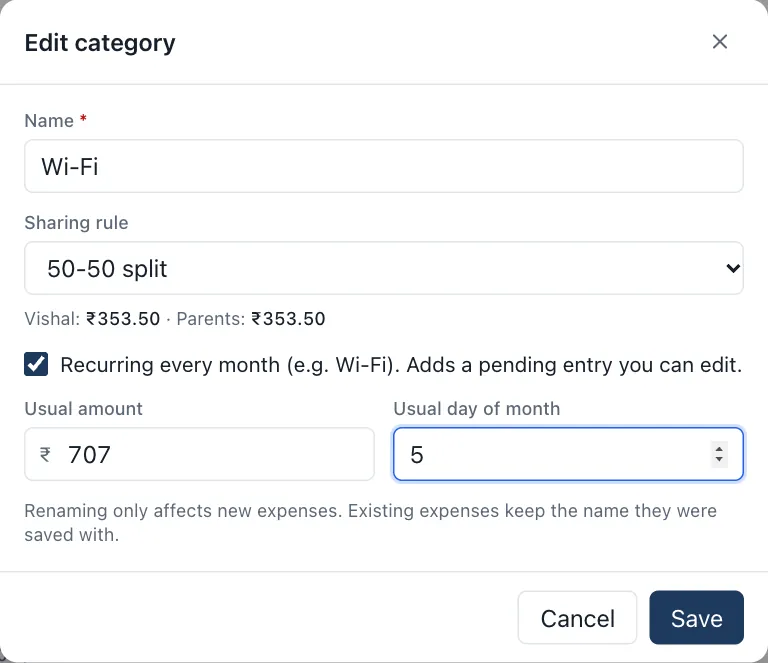
When editing a category you set:
- Sharing rule: how expenses in this category are normally split (see section 12). The preview underneath shows what each person pays for ₹100 or for the usual amount.
- Recurring every month: tick this for bills that come every month, like Wi-Fi or electricity. Enter the usual amount and day, and the app can add them for you each month.
Step 3: Fixed payments
Go to Fixed payments. The app starts with "Monthly payment to parents" at ₹15,000 and "Monthly rent" at ₹7,000. Press the pencil icon to change the name or amount, or Add payment category for a new one. See section 13.
Step 4: Investments (if you have any to repay)
Go to Investments, add each investment, and choose the repayment period. See section 14.
10. Household: the monthly routine
The Monthly workflow page lists the steps for each month. A green tick appears as each step is actually done, based on what you've recorded, so you can see at a glance what's left.
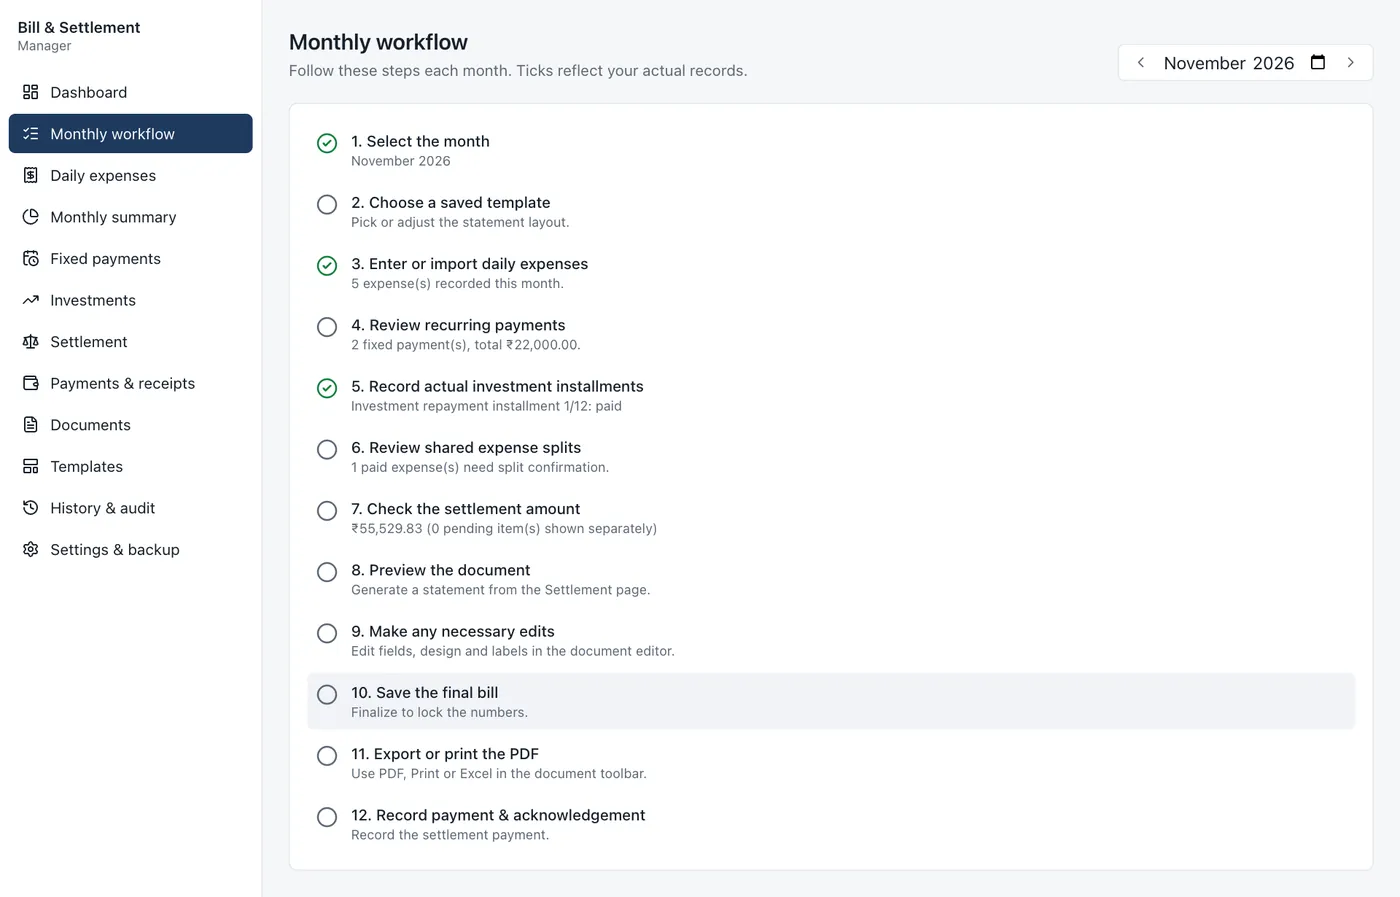
In short:
- Pick the month.
- Enter that month's expenses (or import them).
- Check the fixed payments.
- Record the investment installment once you've paid it.
- Confirm the expense splits.
- Check the settlement amount.
- Generate the statement, review it, and finalize it.
- Download the PDF or print it.
- Record the payment and the other person's acknowledgement.
Click any step to go straight to the right page.
11. Household: recording daily expenses
Go to Daily expenses and press Add expense.
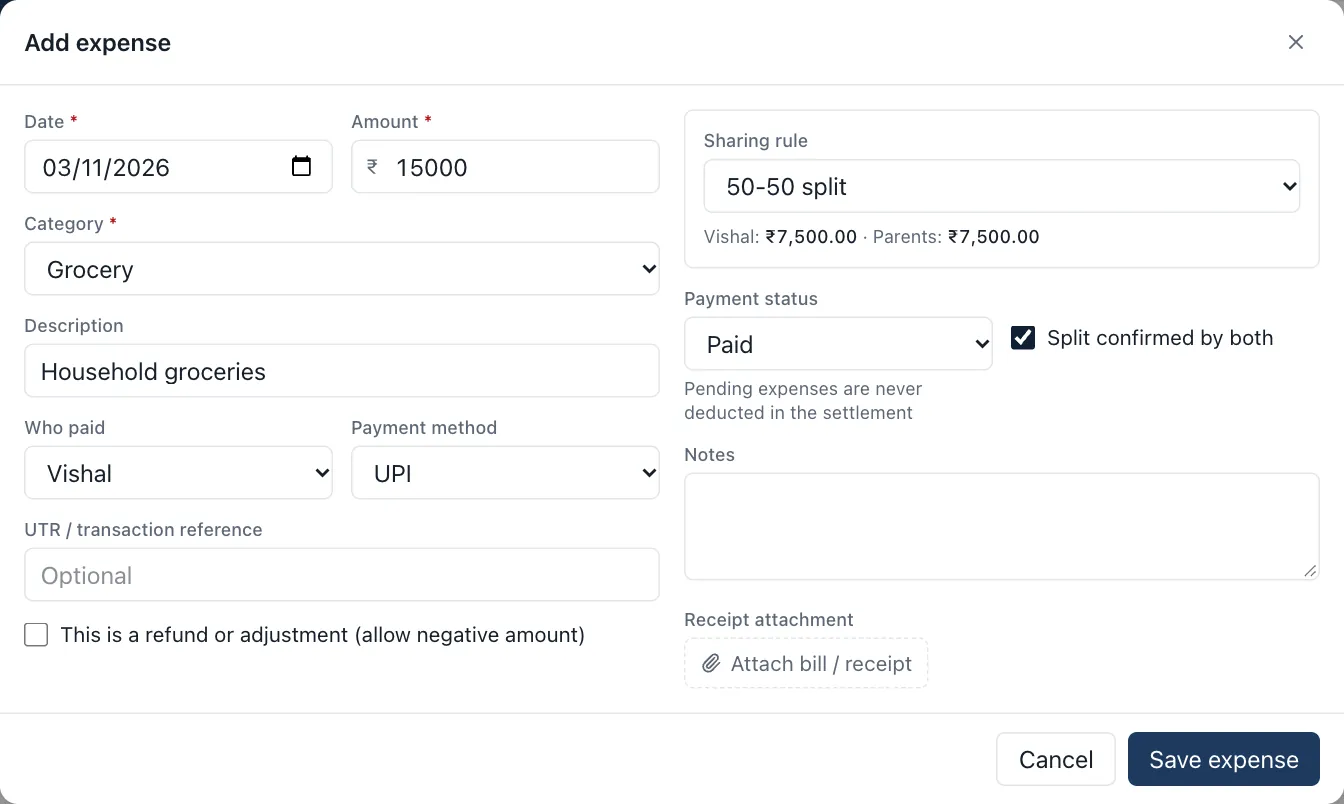
Fill in:
| Field | What to enter |
|---|---|
| Date and Amount | Required. Amounts can have up to 2 decimal places, such as 353.50. |
| Category | Picking a category also fills in its usual sharing rule. |
| Description | Optional, for example "Household groceries". |
| Who paid | You or the other person. |
| Payment method and UTR / transaction reference | Optional, but the UTR helps catch duplicate entries. |
| Sharing rule | Usually filled in from the category. Change it for this one expense if needed. |
| Payment status | Paid, or Pending if the bill hasn't been paid yet. |
| Split confirmed by both | Tick once both people agree on the split. |
| Notes and Receipt attachment | Optional. You can attach a photo or PDF of the bill (up to 15 MB). |
Press Save expense.
If you see "Possible duplicate", the app found another record with the same UTR number, or the same date, category and amount. Check it isn't entered twice. If it really is a separate expense, press Save anyway.
The expenses list
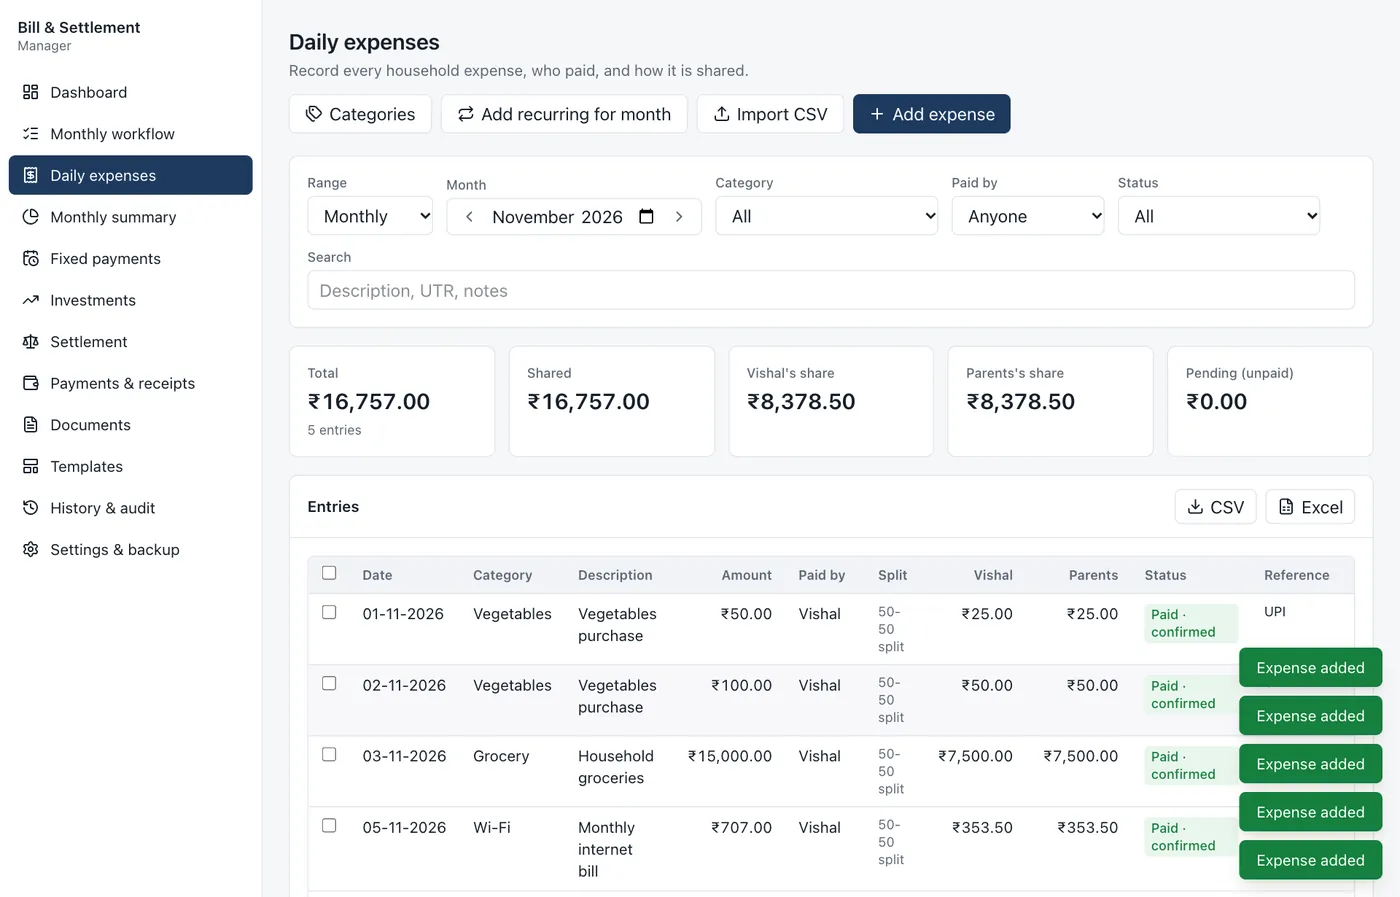
- Filters at the top: show one day, one week, one month, or any date range (Custom). You can also filter by category, who paid, or status, or search by description or UTR.
- Totals for the filtered entries appear above the list: total, shared, each person's share, and pending.
- Each row has buttons to edit, duplicate (handy for repeated purchases) and delete. The app always asks before deleting.
- Status badges: Pending (not yet paid), Paid · unconfirmed (paid, split not yet agreed) and Paid · confirmed (counted in the settlement).
Confirming splits in bulk. Tick the boxes on the left of several rows and press Confirm split.
Recurring bills. Press Add recurring for month to add an entry for every category marked recurring (like Wi-Fi). They're added as Pending with the usual amount. When the real bill arrives, edit the entry, correct the amount and date, and change the status to Paid.
Importing from a spreadsheet. Press Import CSV and choose a CSV file. The first row must contain column headings and needs at least Date and Amount. Date can be written as 05-11-2026 or 2026-11-05. Category, Description, Paid by, Payment method, UTR, Status and Notes are also recognised. Categories that don't exist yet are created for you. Imported expenses arrive with their split unconfirmed so you can review them.
Exporting. Press CSV or Excel above the list to download the entries currently shown.
Monthly summary
The Monthly summary page totals the month by category, shows each person's share, who paid how much, and the net amount one person owes the other for expenses.
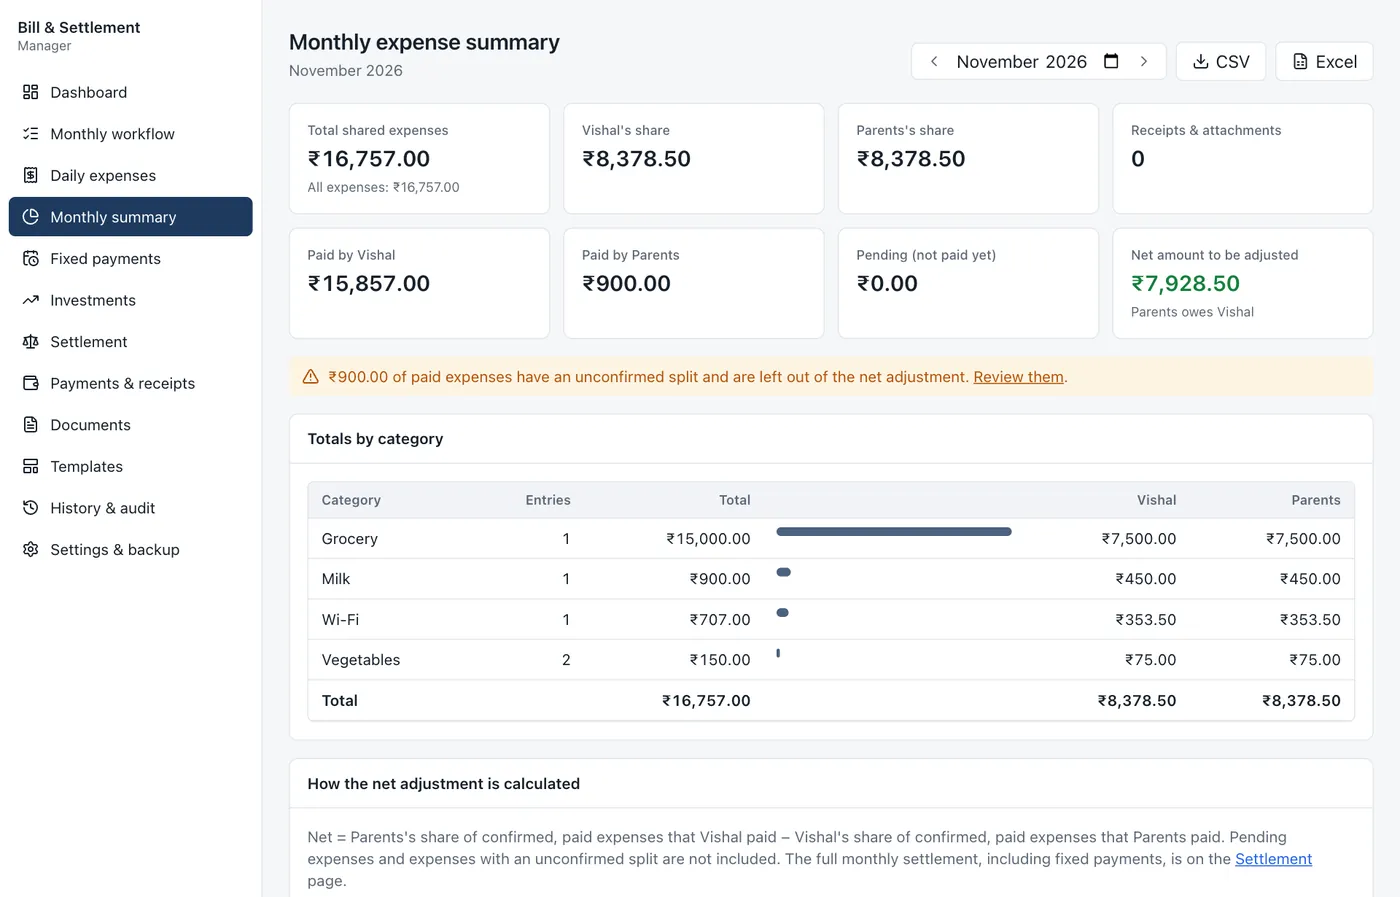
12. Household: how sharing works
Every expense has a sharing rule:
| Rule | Example with a ₹707 Wi-Fi bill |
|---|---|
| 50-50 split | Each pays ₹353.50 |
| Custom percentage | 60% / 40% means you pay ₹424.20 and they pay ₹282.80 |
| Fixed amount | You pay a set ₹200, they pay the rest (₹507) |
| Entirely mine / Entirely the other person's | One person carries the whole bill |
| Excluded from sharing | Recorded, but not shared at all |
| Custom formula | Your own rule, e.g. AMOUNT * 0.4 gives you 40% |
If custom percentages don't add up to 100%, the app shows a warning.
What counts toward the settlement? Only expenses that are paid and have their split confirmed. Pending expenses and unconfirmed ones are listed separately on the settlement so nobody misses them, but they are never deducted until they're paid and confirmed. That stops the same bill being counted twice.
13. Household: fixed payments
Fixed payments are regular amounts such as rent or monthly support.
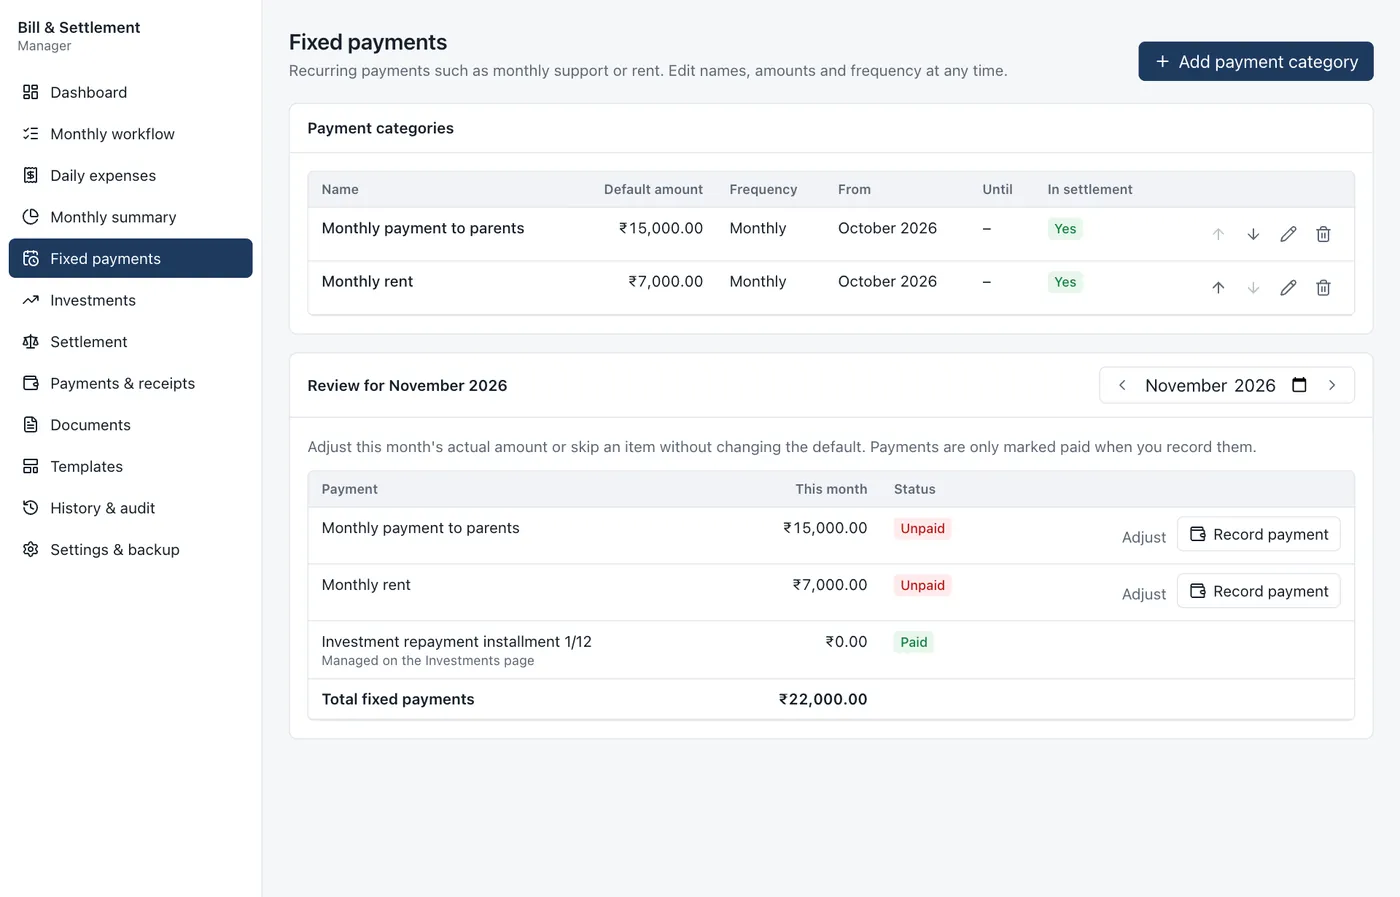
Payment categories (the top list) are the defaults. Each has a name, amount, frequency (monthly, quarterly, half-yearly, yearly or one-time), a start month, an optional end month, and whether it's included in the settlement. Use the arrows to change the order they appear on bills.
Review for [month] (the lower list) shows what applies to the selected month:
- Adjust changes the amount for this month only, or skips the payment this month, without touching the default. For example, rent was ₹6,500 in one month.
- Record payment marks it paid. The app never marks a payment as paid on its own.
The investment installment for the month also appears here, but you manage it on the Investments page.
14. Household: investments and repayment
Use this when investments made on someone's behalf (mutual funds, FDs, LIC and so on) are being repaid in monthly installments.
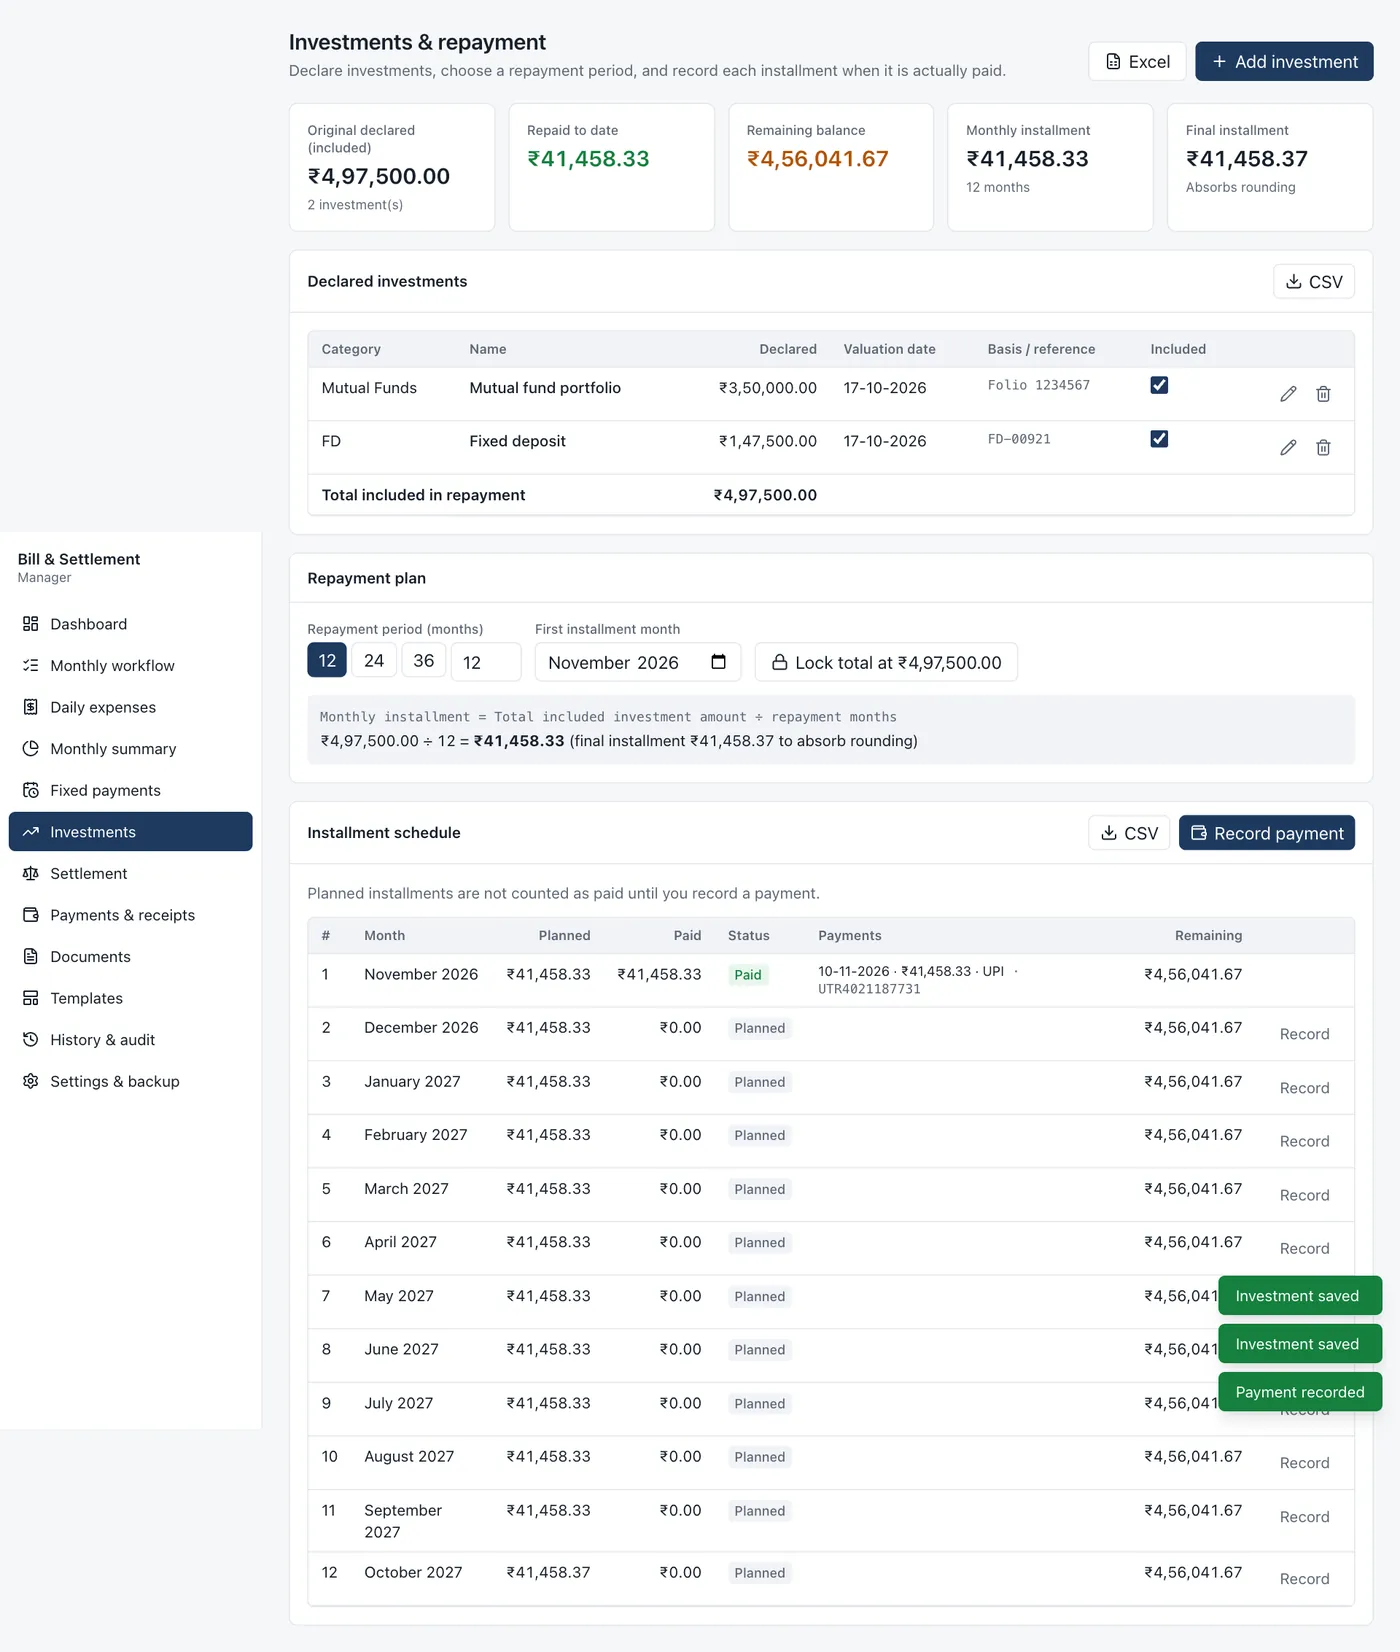
Declaring investments
Press Add investment.
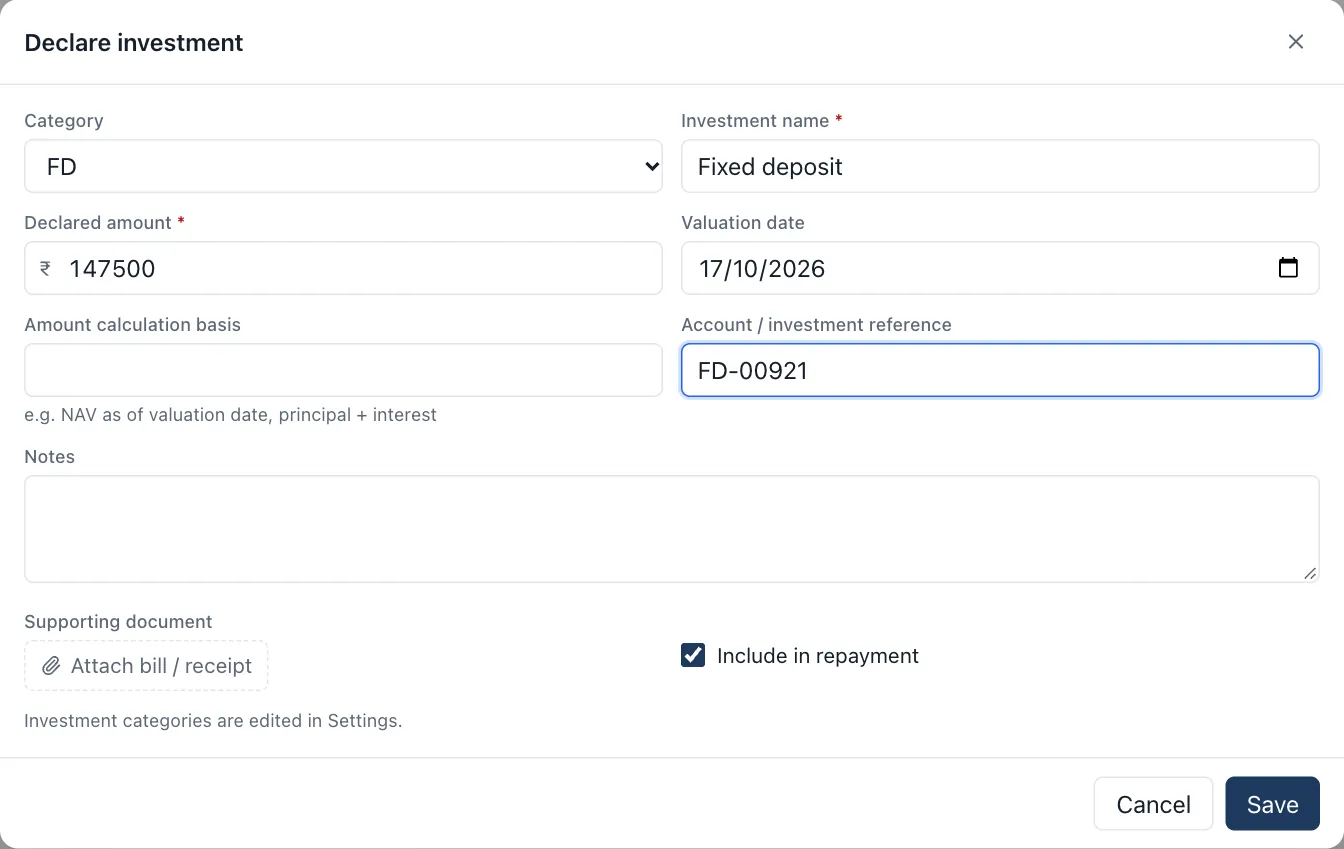
Enter the category, name, declared amount, valuation date, how the amount was worked out (for example "NAV as of valuation date"), the account or folio number, notes, and an optional supporting document. Tick Include in repayment if it should be repaid. The categories list (Mutual Funds, Stocks, NPS, PPF, FD, RD, LIC and so on) can be changed in Settings.
The repayment plan
- Choose 12, 24 or 36 months, or type any number.
- Choose the month of the first installment.
- The app shows the calculation: total included ÷ months = monthly installment. Rounding is added to the last installment so the total always matches exactly. For example, ₹4,97,500 over 12 months is ₹41,458.33 a month, with ₹41,458.37 as the final installment.
- Lock total freezes the amount being repaid. Use it once both sides have agreed the figure, so later changes to the investment list don't change the plan.
Recording an installment
The schedule lists every installment with its planned amount, what's been paid, its status and the remaining balance. A planned installment is not counted as paid until you record it. Press Record on the row once you've actually made the payment:
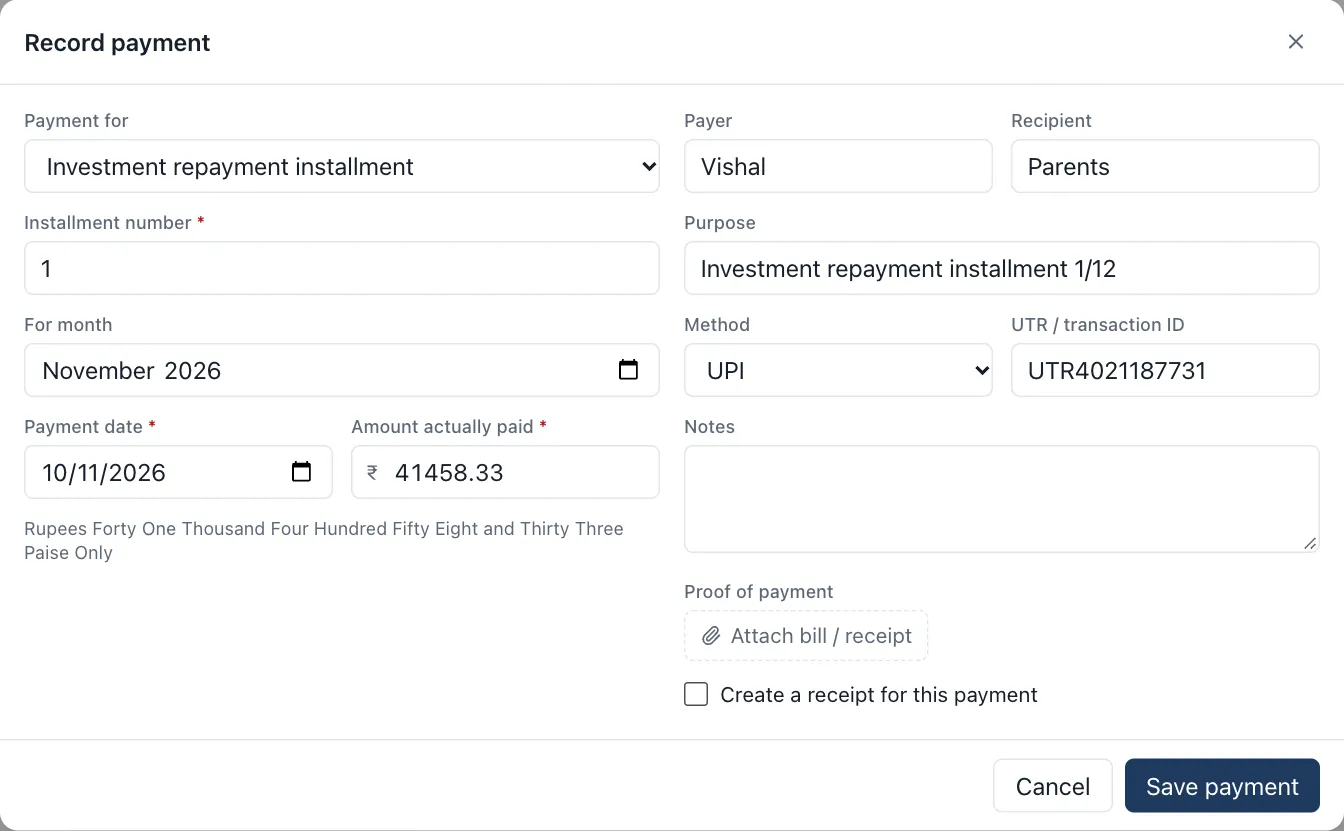
Check the amount actually paid, the date, the method and the UTR number. Underneath the amount the app writes it out in words. Tick Create a receipt for this payment if you want a receipt straight away. A smaller amount than planned is fine: the installment shows as Partly paid.
15. Household: the monthly settlement
The Settlement page puts everything together and shows exactly how the final figure is reached.
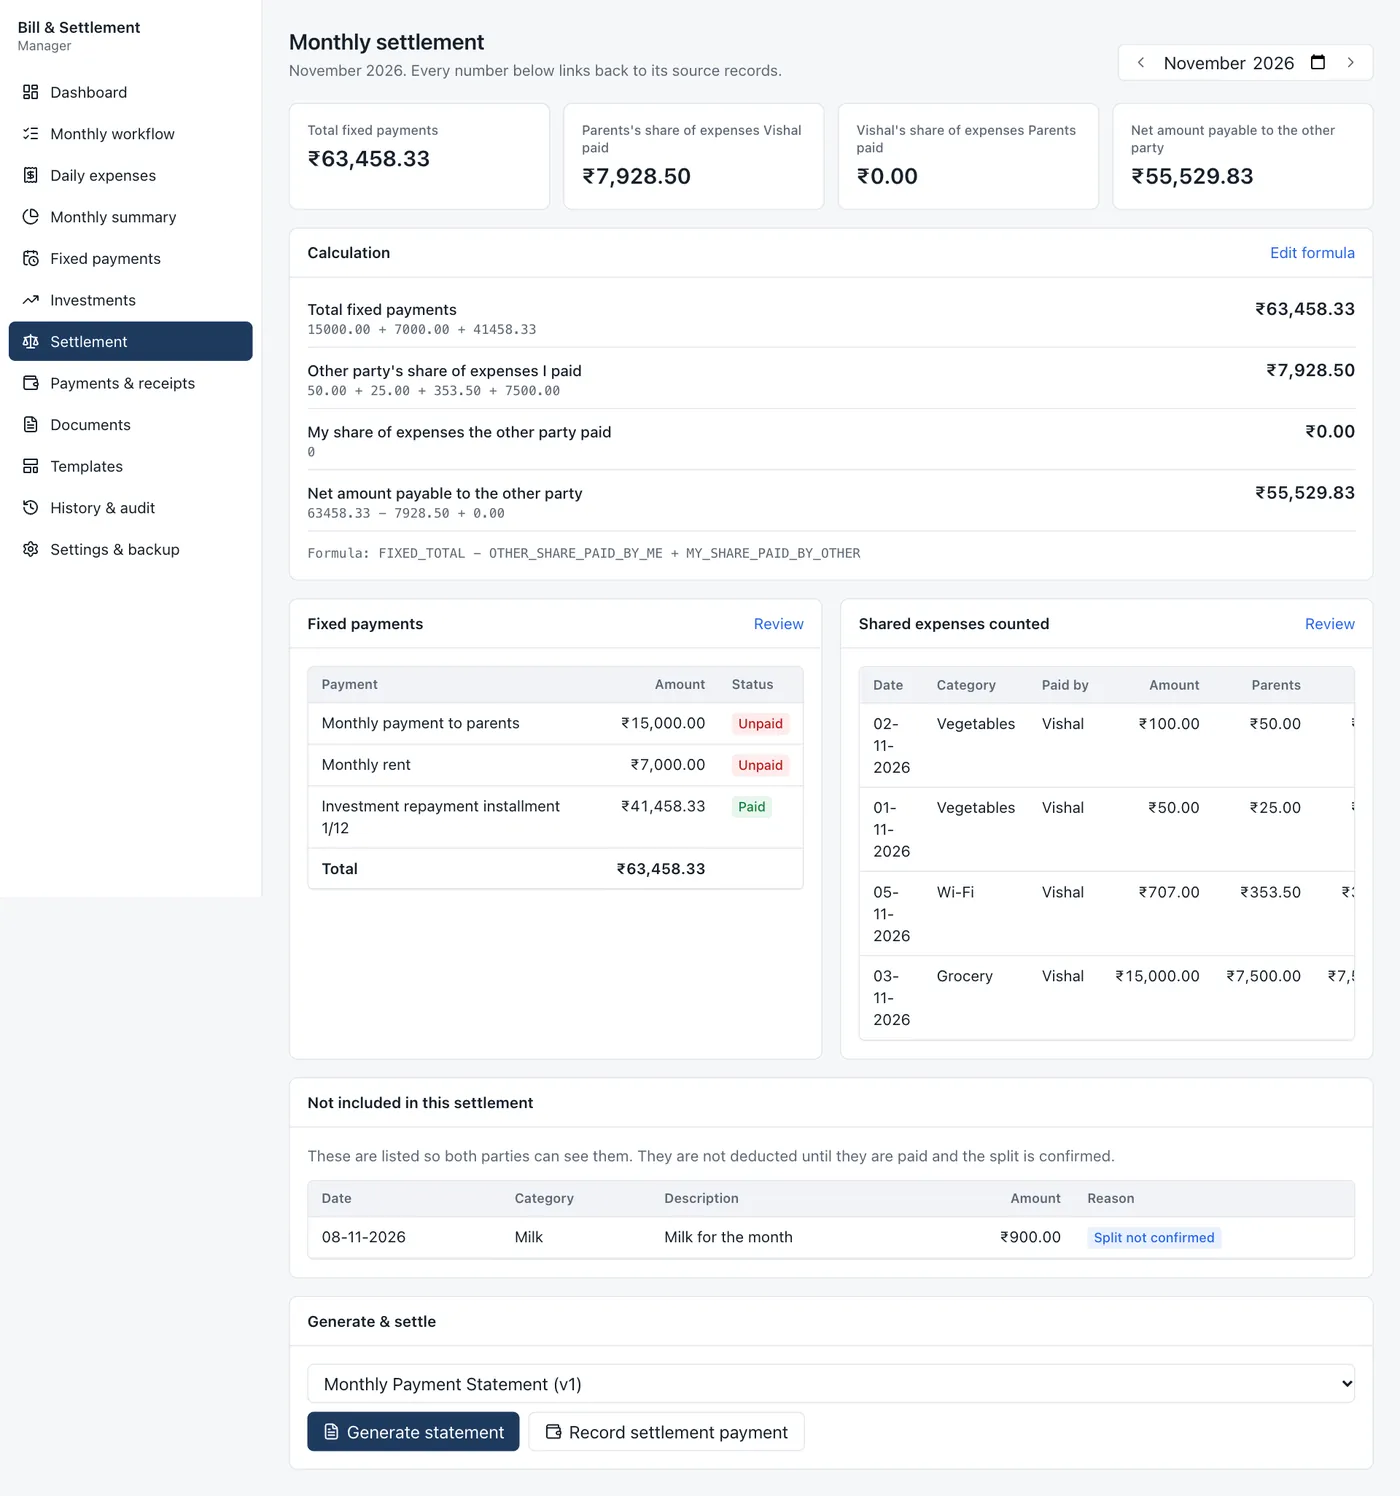
The standard calculation is:
Amount payable = Total fixed payments − the other person's share of expenses you paid + your share of expenses they paid
For example: fixed payments of ₹63,458.33, minus the other person's ₹7,928.50 share of the shared bills you paid, gives ₹55,529.83 payable.
The page shows:
- Calculation: each step with the actual numbers used, so both people can check it.
- Fixed payments: what's included this month and whether each one is paid.
- Shared expenses counted: every paid, confirmed expense and how it was split.
- Not included in this settlement: pending expenses and expenses whose split isn't confirmed yet. In the example, the ₹900 milk bill is listed here because its split wasn't confirmed.
If you need a different rule, press Edit formula (see Changing the settlement formula).
At the bottom, Generate statement creates the monthly bill, and Record settlement payment records the money once it's paid.
16. Finding old bills and history
- Bills & documents lists every bill, statement and receipt. Filter by type, month or status (draft or final), or search by title. Old documents can be archived to keep the list tidy; tick Show archived to see them again. The copy icon creates next month's version in one click.
- History & audit shows month-by-month totals with links to that month's documents, and an audit trail of every important change: what was added, edited, deleted, finalized or restored, and when.
17. Backing up your data
Your data is already saved in your account, so you don't need backups to stay safe. A backup file is still useful as your own copy, to move data elsewhere, or before erasing everything.
Go to Settings, then the Account & data tab.
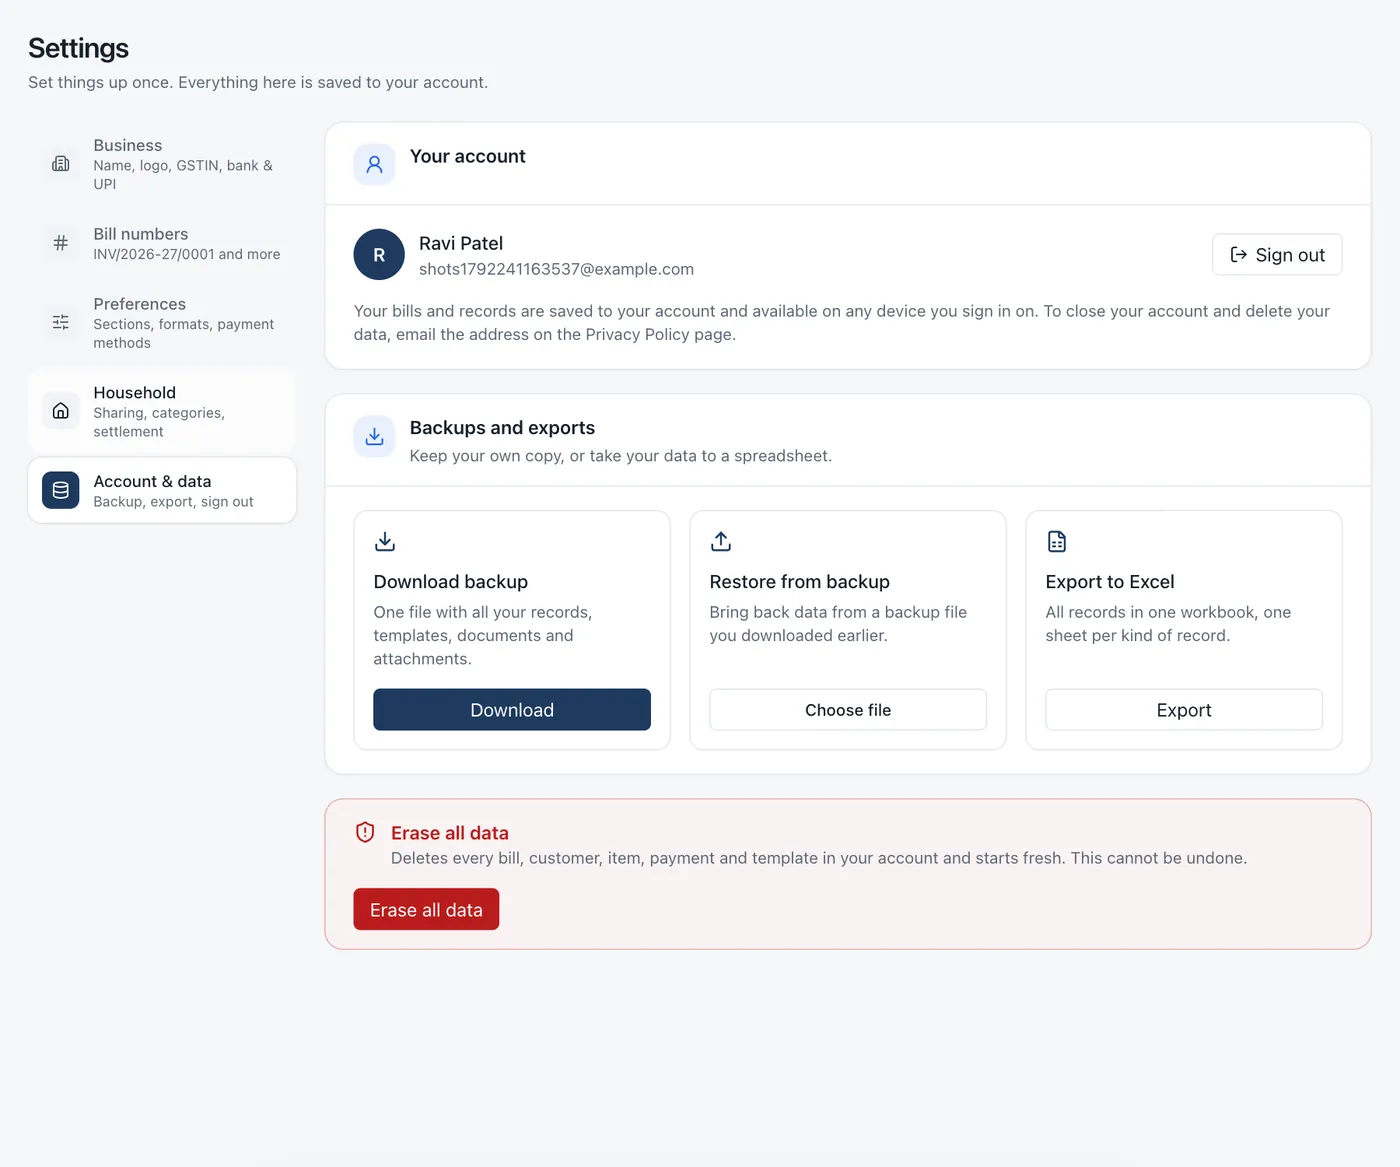
- Download backup saves one file containing everything: expenses, payments, investments, templates, documents, attached bills and the audit log. Keep a copy somewhere safe, such as Google Drive.
- Restore from backup → Choose file loads a backup file. Choose Replace everything with the backup to swap your current data for it, or Add to my current data to combine them.
- Export to Excel downloads one spreadsheet with a sheet for each kind of record, useful for your own analysis or for an accountant.
- Erase all data, in the red box at the bottom, deletes everything in your account and starts fresh. The app asks twice. Download a backup first.
- Your account at the top shows who is signed in, with a Sign out button.
Moving to a new computer or phone: just sign in there. Everything is in your account.
18. Common questions
The app is empty and my data has gone. Check you're signed in with the same account (Google or email) you normally use; the name at the bottom of the menu shows which one. Each account has its own data.
I can't sign in. Use Forgot password? on the sign-in page. If you normally use Google, press Continue with Google instead of typing a password.
The menu says "Offline" or "Sync problem". Offline: keep working, your changes upload when the internet is back. Sync problem: read the message at the top of the page. The most common cause is a logo that's too large; use one under 200 KB.
The invoice shows IGST but my customer is in my state (or the other way round). Check the State in Settings (your business) and on the customer. Or set the Tax box on the bill to CGST + SGST or IGST yourself.
Can I change an invoice number? Yes, while the bill is a draft you can type over it. To change what future numbers look like, open Settings > Bill numbers.
The settlement doesn't include an expense I added. Check it on Daily expenses. It must be Paid (not Pending) and have its split confirmed. Otherwise it appears under "Not included in this settlement".
I corrected an expense but the statement still shows the old amount. Open the statement and press Refresh data. If the statement is final, press Reopen first, or make a fresh one. Final documents never change by design.
I changed a template but my old bills look the same. That's intentional. Old documents keep the layout they were made with. Use Next month / duplicate with "Use the latest version" to make a new one in the new layout.
An installment shows "Planned" even though it's this month. Installments only count as paid once you record the payment. Press Record on that row.
"Possible duplicate" appeared when saving. Another record has the same UTR number, or the same date, category and amount. Check you haven't entered it twice. If it really is separate, press Save anyway.
A formula shows an error. The message says what's wrong, for example an unknown name or division by zero. Open the field in the template builder, fix the formula, and watch the result update as you type. The list under the formula box shows every name you can use.
Hindi looks wrong when I copy text from the PDF. The PDF stores the page as a picture so Hindi always displays correctly, which means its text can't be copied. Use Print, then Save as PDF, if you need selectable text.
What do the status labels mean?
| Label | Meaning |
|---|---|
| Pending | The expense hasn't been paid yet. Never deducted. |
| Paid · unconfirmed | Paid, but both people haven't agreed the split yet. Not deducted. |
| Paid · confirmed | Paid and agreed. Counted in the settlement. |
| Planned / Partly paid / Paid | Investment installments: not yet paid, paid in part, paid in full. |
| Unpaid / Paid | Fixed payments for the month. |
| Draft / Final | Documents: still editable, or locked for good. |
| Unpaid / Part paid / Paid | Invoices: how much of the total has been recorded as received. |